
Stairs Railing Design That Looks Great and Stays Safe

You're usually not thinking about stair railings while staring at bare framing with a coffee in one hand and a permit drawing in the other. You're thinking about the look you want. Clean black metal. Maybe glass. Maybe something warmer that matches the fence and the trim.
That's also the exact moment when most railing mistakes get baked into the job.
On real deck projects in Guelph, the stair run is where style and code stop being separate conversations. A railing that looks sharp across a flat deck can get awkward fast once it has to turn a landing, follow a nosing line, stay graspable in winter gloves, and still avoid oversized gaps or climbable geometry. Good stairs railing design isn't about choosing the pretty option first and sorting out safety later. It's about designing both at the same time, because the stair flight doesn't forgive lazy decisions.
Table of Contents
Standing at the Top of the Stair and Planning the Railing - The stair is where modern looks get tested - The best-looking railing usually starts with the ugly questions
Ontario Code Basics Every Homeowner Should Know - The numbers that actually control the design - Where homeowners usually get mixed up
Popular Railing Styles and How They Work on Stairs - Four style families and the trade-offs - What usually works best by project type
Choosing Materials That Hold Up at Stair Transitions - How common materials behave on real exterior stairs - The combinations that usually perform better
Layout Details That Make a Stair Railing Work Reliably - Post placement sets the line - The landing break has to look intentional - Small measurements change how the rail feels
Myths That Lead to Costly Railing Mistakes - Taller isn't automatically safer - Horizontal doesn't automatically mean modern done right - Glass isn't maintenance-free
Permit-Ready Checklist for a Guelph Deck Build - What to confirm in writing - What should be on the drawings - Questions that expose scope gaps early
Standing at the Top of the Stair and Planning the Railing
A common site moment goes like this. The deck frame is in, the stair opening is cut, and everyone naturally looks outward at the yard. That's when homeowners start pointing at inspiration photos. Black posts. Thin lines. Open view. Nothing bulky.
Fair enough. The problem is that the stair doesn't behave like the flat part of the deck.
At the top of an unfinished stair, you're not only deciding what the railing should look like. You're deciding where the posts can land without crowding the treads, how the handrail will feel under your hand on a wet November morning, and whether the transition from deck guard to stair rail will look deliberate or patched together after inspection comments. That's why stairs railing design has to start before the decking goes down, not after.
The stair is where modern looks get tested
A cable or rod layout can look crisp in a showroom photo. On a stair, the same idea has to deal with changing angles, tighter post spacing, and a layout that doesn't accidentally create a ladder effect for kids. Glass can look beautifully open, but once you add a landing and a stair drop, the framing and edge support start deciding the design more than the Pinterest board does.
Practical rule: If a railing style only looks good in the flat section and starts getting awkward at the first tread, it's the wrong system for that project.
Wood balusters often get dismissed too quickly because they seem less modern. But on deck-to-stair transitions, a simple vertical layout can solve several problems at once. It reads clearly, adapts to the angle, and usually looks more natural where the stair meets the landing.
The best-looking railing usually starts with the ugly questions
Before choosing infill, ask the questions that people usually leave too late:
Where do the posts go: A post that sits too far back from the stair edge can make the rail feel detached from the steps.
How does the top landing change the line: The eye notices a sloppy height change immediately.
What gets touched every day: Handrails on stairs take more abuse than almost any other rail section on the build.
What happens in February: Snow, salt, and freeze-thaw don't care that a detail looked elegant in summer.
That's the planning moment. Not “what style do I like?” but “what style still works once this becomes an actual stair people use?”
Ontario Code Basics Every Homeowner Should Know
Stand at the top of a deck stair in Guelph and the design choices narrow fast. The clean modern railing a homeowner likes on the flat deck still has to meet guard height, handrail height, opening limits, and the no-ladder problem once it turns down the stair. That is why style and code are the same conversation on a deck-to-stair transition.
The numbers that actually control the design
Ontario requires a guard when the walking surface is more than 600 mm above adjacent grade, as outlined in Ontario deck guard guidance. On real backyards, that point often shows up at one corner first because grade falls away, even if the rest of the deck feels low.
For exterior residential decks and landings, the usual guard heights are 900 mm up to 1,800 mm above grade, and 1,070 mm once the drop exceeds 1,800 mm, based on Ontario deck and stair code guidance. Homeowners tend to see that as a small measurement change. On site, it affects post length, rail proportions, and whether a slimmer-looking system still feels solid.
Handrails are measured differently from guards. Ontario guidance puts the handrail height at 865 mm to 965 mm above the stair nosing line in this railing and baluster reference. Inspectors do not measure from the tread surface at random points. They measure from the nosing line, so a stair can look right and still miss.
Openings matter more than many drawings admit. Ontario limits guard openings so a 100 mm sphere cannot pass through, as set out in the Ontario Building Code guard opening reference. On stairs, that rule starts shaping the design in quiet ways. It affects baluster spacing, the triangle at the tread and bottom rail, and whether a modern infill still works once the rail slopes.
If you want a broader homeowner-friendly read on why approvals matter before construction starts, this guide to building codes and permits for additions explains why getting code questions settled on paper saves trouble later.
Code Item | Measurement | Where It Applies |
|---|---|---|
Guard required trigger | 600 mm | Walking surfaces above adjacent grade |
Deck or landing guard height | 900 mm | Decks and landings up to 1,800 mm above grade |
Deck or landing guard height | 1,070 mm | Decks and landings where fall exceeds 1,800 mm |
Handrail height | 865 mm to 965 mm | Measured vertically from stair nosing line |
Opening limit | 100 mm sphere | Guard and infill openings |
Where homeowners usually get mixed up
The common mistake is assuming one railing detail can run everywhere unchanged. It usually cannot. A deck perimeter, a landing edge, and a stair run may belong to the same project, but they get checked differently and built differently.
That is where modern looks run into code reality. Horizontal members can look sharp in a rendering, but on a stair they can create a climbable pattern, especially for kids, and the transition pieces often get bulky once you tighten spacing enough to satisfy opening rules. Vertical systems usually give you more room to solve those problems cleanly.
For a local reference, many homeowners compare their plans against this focused Ontario deck railing code guide before signing off on drawings.
A railing should be drawn the way it will be measured in the field, not the way it looked in the inspiration photo.
Popular Railing Styles and How They Work on Stairs
Some railing styles are easy to love on a flat deck and harder to live with on stairs. That doesn't mean they're bad. It means the stair exposes their weak spots faster.
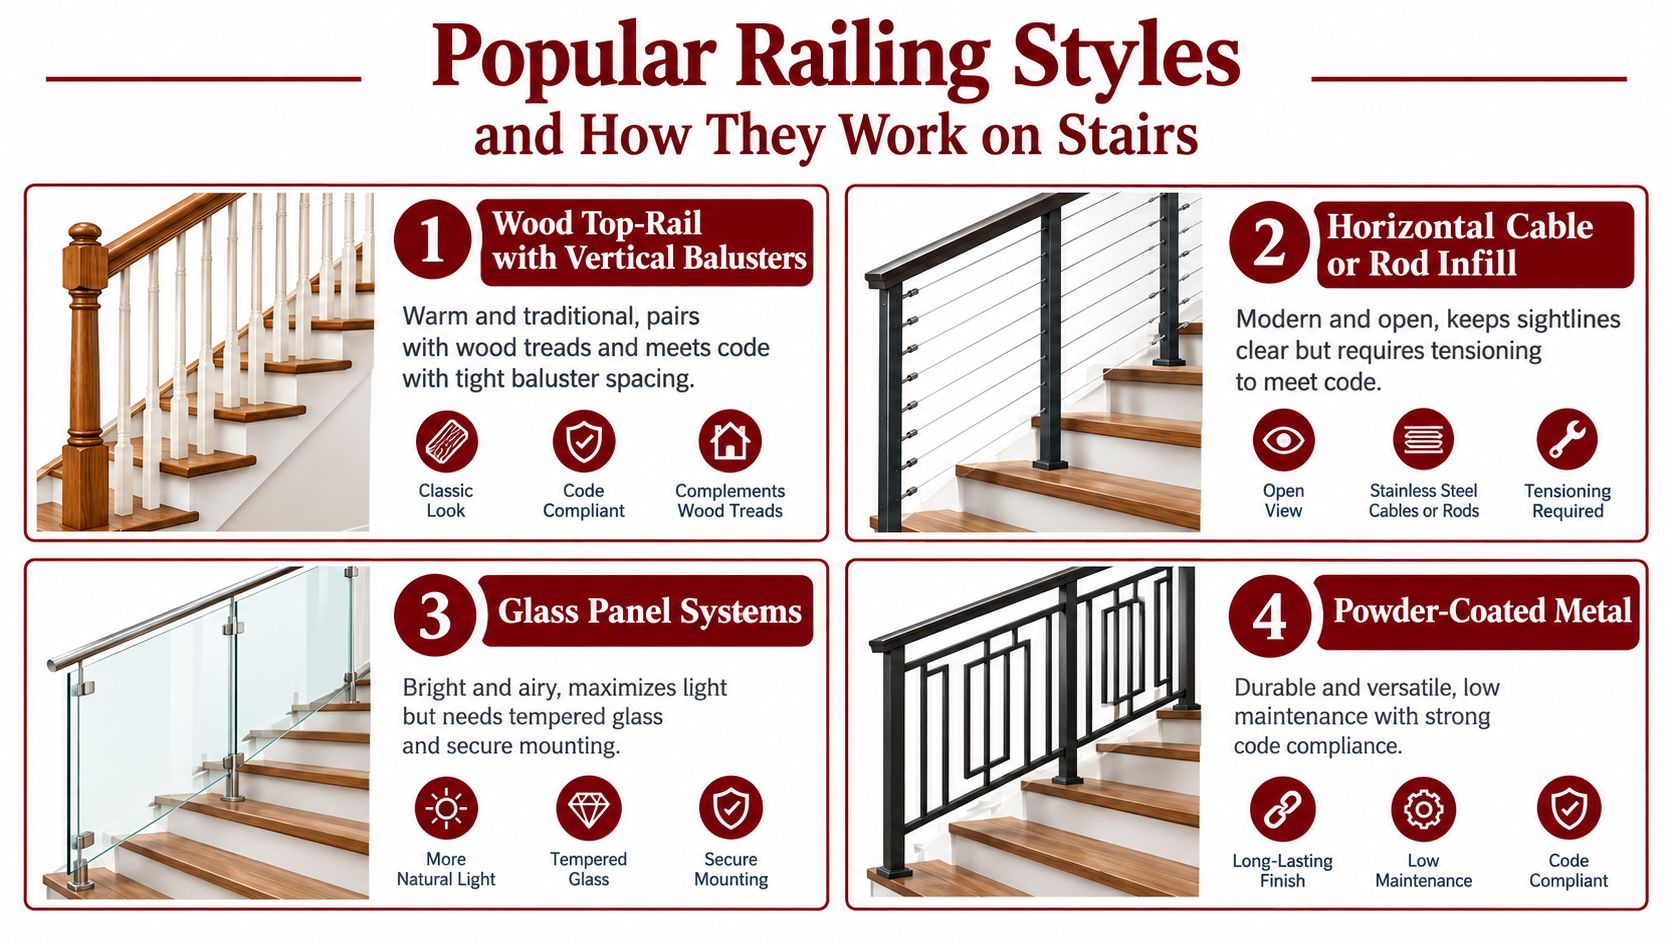
Four style families and the trade-offs
Wood top rail with vertical balusters is still one of the most forgiving systems on stairs. It adapts well to angles, can look traditional or pared back depending on profile, and usually transitions cleanly from deck guard to stair run. It's not the flashiest option, but it often gives the least grief where the landing meets the first few treads.
Horizontal cable or rod infill gives you that open, linear look people ask for all the time. On stairs, though, it needs a careful eye. Ontario guidance warns that guard design must not facilitate climbing, and one Ontario municipal guide cited in this code summary says no horizontal members may be installed on the guard within a specified band if they create a climbable condition. That's where many “modern” concepts hit reality.
Glass panel systems keep sightlines open and can make a smaller backyard feel less boxed in. On stairs, they need better planning than people expect. Panel edges, post layout, and mounting all become more fussy once the railing changes pitch.
Powder-coated metal is often the best middle ground. It can read contemporary, it behaves well on angles, and it doesn't rely on fragile visual tricks to look clean.
What usually works best by project type
For family decks: Vertical infill is usually the calmest solution. It's easier to keep consistent and less likely to create climbable geometry.
For view-focused backyards: Glass can be worth it if the budget and maintenance tolerance are there.
For modern renovations: Black metal with simple vertical pickets often lands better than horizontal systems because it keeps the look current without fighting stair code.
For mixed-material homes: A wood cap over metal posts can bridge old and new nicely.
Here's a good visual walkthrough if you want to compare systems in motion rather than in still photos.
A side note that surprises people. Stair design cost questions show up outside deck work too. This guide on the cost of attic conversion stairs is useful because it shows how stair complexity, not just material choice, drives price and fabrication decisions.
The cleanest-looking stair rail is usually the one that doesn't need excuses at the landing.
Choosing Materials That Hold Up at Stair Transitions
The stair transition is where nice-looking railing packages get exposed.
On a deck, a material only has to look straight and stay clean. On the stair, it gets grabbed with wet gloves, hit by shovels, buried in slush at the bottom tread, and baked dry again in July. The joint where level guard turns into sloped guard also puts more stress on fasteners, trims, and post connections. If a system is weak at cut ends, sleeves, or brackets, that weakness usually shows up here first.
How common materials behave on real exterior stairs
Cedar still has a place. It feels better in the hand than metal in cold weather, and it suits older Guelph homes well. The trade-off is wear at the graspable edge and more maintenance at post bases, especially where water sits near end cuts or hardware penetrations.
Pressure-treated lumber stays popular because it is affordable and easy to frame around. It can work fine on stairs if the profile is comfortable to grip and the detailing is tidy. It also tends to check, splinter, and roughen sooner in hand-contact areas than homeowners expect. For a closer look at profiles and finish trade-offs, this guide to pressure-treated wood handrail options is worth reviewing.
Composite is useful, but usually as part of a system rather than the whole answer. A composite cap can lower upkeep and give a cleaner finished edge, yet some profiles feel bulky in the hand and awkward once the rail pitches down the stair. I would not choose it blindly for returns, transitions, or any spot where the manufacturer's trim details already look busy on paper.
Vinyl can hold up acceptably on simple guard runs, but stairs are less forgiving. Impact marks at the lower post, grime around joints, and flex at connection points tend to show earlier there than on the flat deck. Homeowners who want a crisp modern look are often disappointed by how quickly vinyl starts to feel a bit soft visually.
Powder-coated aluminum and properly finished steel usually handle stair duty best. They stay straighter, manage angles cleanly, and take repeated use without the handrail feeling tired after a few seasons. In Ontario, they also pair well with layouts that need to satisfy guard spacing and anti-climb concerns without awkward workarounds.
Material | Stair Hand Contact Wear | Freeze-Thaw & Salt Resistance | Typical Refinish Cycle | Best Stair Application |
|---|---|---|---|---|
Cedar | Comfortable to grip, can wear softer over time | Moderate with proper detailing | Periodic sealing or staining | Wood handrails and traditional baluster runs |
Pressure-treated wood | Serviceable, can feel rougher as it ages | Moderate, depends on cuts and maintenance | Periodic finishing and inspection | Budget-conscious full wood systems |
Composite | Stable surface, profile matters for grip | Good in exposed conditions | Low routine refinishing | Cap rail or trim component in mixed systems |
Vinyl | Smooth initially, can show impact wear | Good surface resistance, less solid feel at impact points | Low routine refinishing | |
Aluminum or steel | Strong under heavy use | Strong when properly finished | Minimal finish upkeep | Posts, balusters, and mixed-material stair systems |
The combinations that usually perform better
Mixing materials often solves stair problems better than forcing one material to do every job.
Wood top rail with metal balusters: Better grip in cold weather, with infill that stays straight and easier to space cleanly on a slope.
Composite cap on aluminum framing: Lower maintenance than full wood, while keeping the structure stiff at the pitch change.
Full metal stair rail: Usually the cleanest option for snow exposure, tight deck-to-stair transitions, and modern layouts shaped by Ontario guard rules.
That last point matters more than style guides admit. Code and material choice are tied together on stairs. A railing that looks great in a showroom can become clumsy once you account for guard height changes, the sphere rule, and the fact that some horizontal or heavily framed patterns are harder to execute cleanly at the deck-to-stair break.
Budget surprises usually come from the hidden parts, not the visible rail profile. Post anchors, welded fittings, stair-specific brackets, fascia reinforcement, and custom transitions add cost quickly. This overview of hidden hardscape project expenses is useful for that reason, because the same pattern shows up on deck stairs all the time.
One field rule holds up well. If a material barely works on the flat run, it usually underperforms on the stair.
Layout Details That Make a Stair Railing Work Reliably
A lot of stair rails fail in the layout stage, not in the finishing stage. The parts may be code-compliant, but the rail still looks off, feels awkward in the hand, or creates a clumsy break where the deck guard turns into the stair guard. On Guelph builds, that usually starts at the top post and gets worse from there.
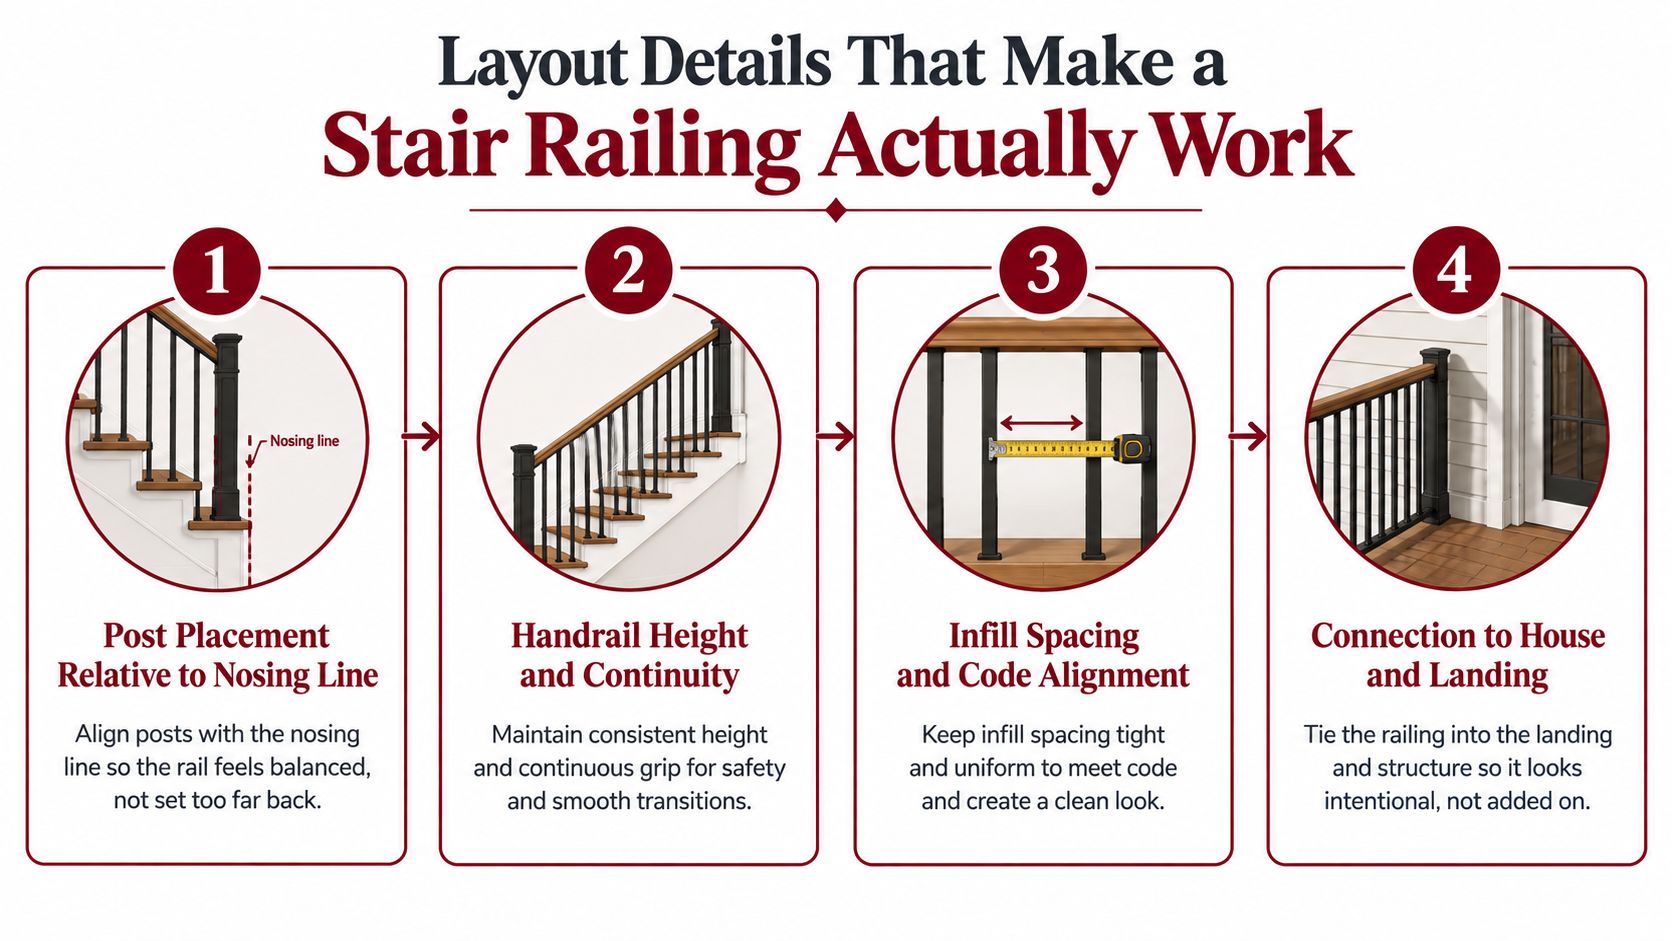
Post placement sets the line
Set the first stair post from the nosing line, not by eye from the deck edge. If that post lands too far back, the rail starts late and looks disconnected from the stair run. If it lands too far forward, the tread edge gets crowded and the whole entry feels tight.
This matters even more at a deck-to-stair transition, because Ontario's guard and opening rules shape the geometry before style enters the conversation. A clean modern rail only stays clean if the post locations let the infill, top rail, and graspable handrail all land where they should.
Wide stairs need extra discipline. As noted earlier, Ontario requires a handrail on at least one side, and on both sides once the stair reaches the width threshold. Homeowners often focus on symmetry here and end up treating both sides as display rails. One side still has to work like a handrail first.
The landing break has to look intentional
The toughest point in the whole assembly is where the level guard meets the sloped stair section. The code treats those as different conditions, with the stair guard measured from the nosing line and the landing guard measured from the walking surface. That is why one continuous-looking rail often needs a deliberate change in height and proportion. The details are set out in Ontario building code guidance at Ontario building code guidance.
Good layouts handle that shift clearly.
At the landing: let the taller guard read as the heavier section
On the stair run: follow the slope cleanly instead of dragging the landing height too far down
At the tie-in point: change the post spacing or panel rhythm on purpose so the transition reads as designed, not mismeasured
A lot of so-called modern rails look best in elevation drawings and worst at this exact junction. Thin horizontal lines can exaggerate every mismatch. Vertical pickets or simple aluminum systems usually forgive the transition better.
Small measurements change how the rail feels
Handrails need to be easy to catch without looking for them. On a tight stair, a rail that is technically present but tucked too close to a wall or post cluster is a poor layout choice.
Returned ends help. So does keeping the graspable portion consistent through the full run instead of interrupting it with decorative fittings where the hand naturally slides. On inside stringers, wall clearance matters for comfort as much as code compliance, especially once winter gloves enter the equation.
One field check helps before fabrication. Stand at the top tread and sight the rail path down the stair. If the first reach feels crowded, the bottom panel looks pinched, or the landing post seems to belong to a different railing, the layout is still wrong.
One practical option homeowners sometimes use during planning is working from permit-ready drawings prepared by a local deck contractor. Guelph Deck Builders provides that kind of documentation for residential deck, stair, and railing layouts, which helps settle post locations and transition details before construction.
Myths That Lead to Costly Railing Mistakes
Plenty of bad railing decisions start with ideas that sound sensible for about five minutes.
Taller isn't automatically safer
Homeowners often ask for a rail that's “a bit higher just to be safe.” The instinct is understandable. The problem is that code already sets the geometry the inspector expects, and random height changes can make the railing look oversized, block sightlines, and create awkward transitions at stairs and landings.
Ontario's code history also shows that guard and handrail treatment has evolved over time, including published change notes stating that the maximum handrail height was increased from 965 mm to 1,070 mm in the province's code changes at Ontario code change notes. That history is a good reminder that these dimensions are part of a system, not a place for guesswork.
Horizontal doesn't automatically mean modern done right
A lot of homeowners use “horizontal” and “modern” as if they're the same thing. They aren't. Ontario guidance repeatedly links open-guard aesthetics with the 100 mm sphere rule and warnings against climbable layouts, as discussed in this Ontario accessibility and exterior railings article. A wide, low horizontal layout can look sleek in a photo and still be a bad fit for a family deck.
Glass isn't maintenance-free
Glass is low visual weight, not zero maintenance. You'll clean it. You'll notice mineral spotting. You'll pay attention to joints and hardware because stairs concentrate grime at the exact height where everyone sees it.
And no, not every carpenter builds a great stair rail. A passing flat-deck guard doesn't prove someone understands graspability, transitions, or the weird little openings that can fail once the stair angle comes into play. That's where experience shows up fast.
Permit-Ready Checklist for a Guelph Deck Build
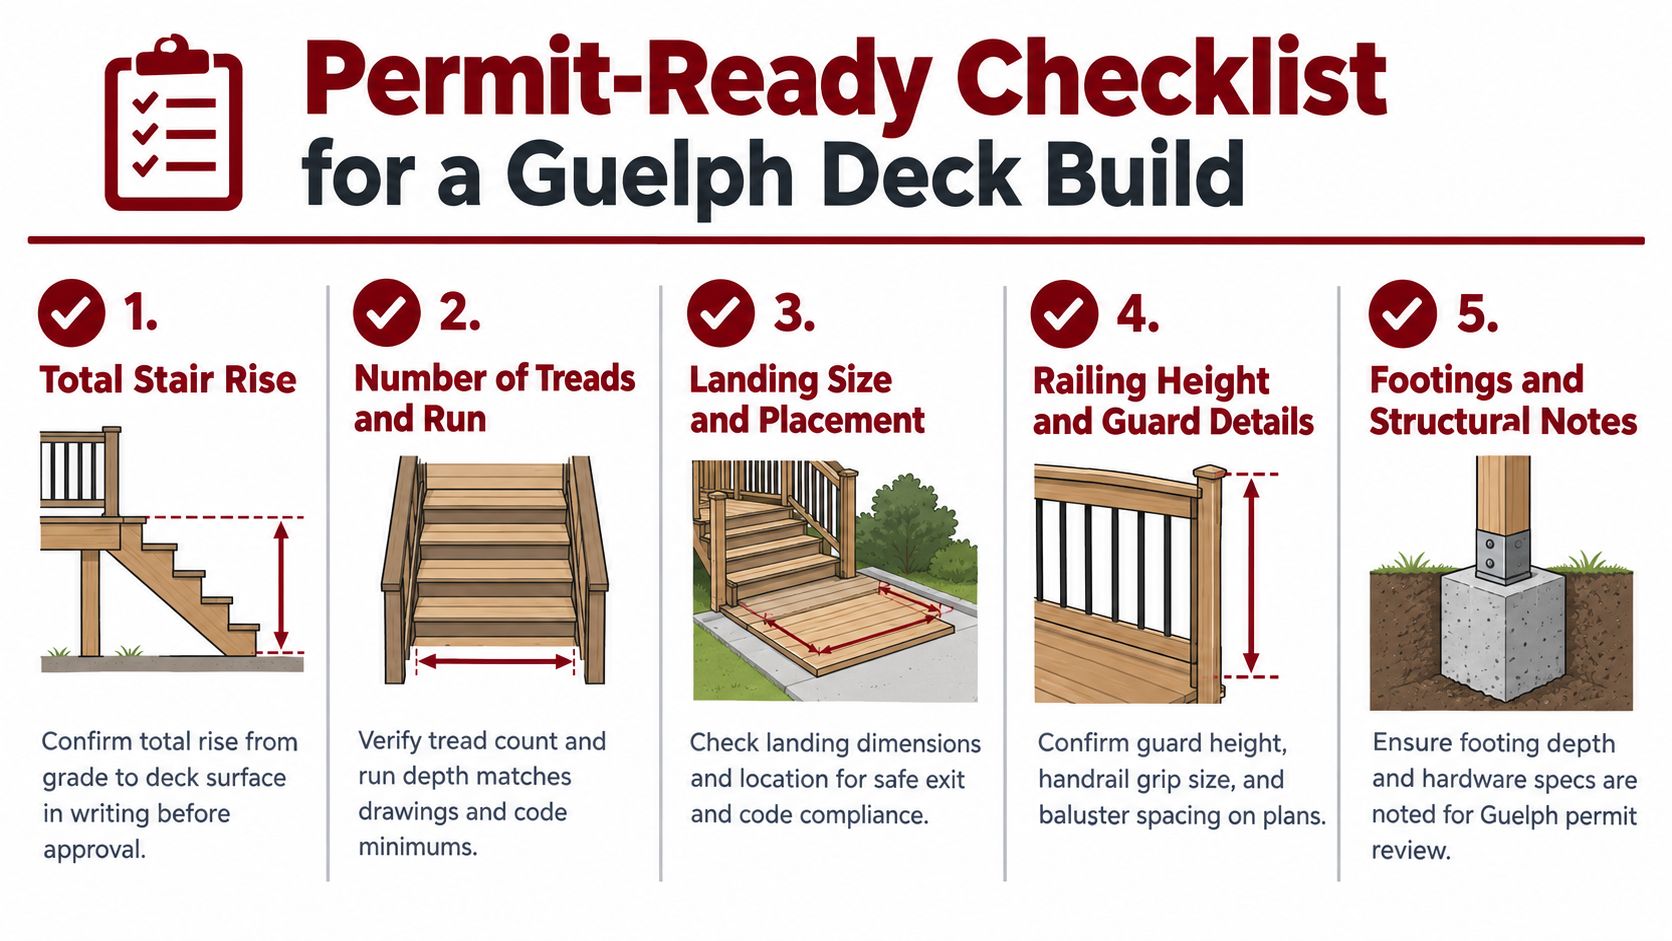
If you want fewer surprises, get the stair questions answered on paper before anyone starts cutting posts. A permit-ready railing package doesn't need to be fancy. It needs to be complete.
What to confirm in writing
Ask for the basic stair geometry first. Not casually. In writing.
Total stair rise: Confirm the full vertical change from finished walking surface to finished walking surface.
Tread count and run: Make sure the stair length works with the yard, gate, and landing location.
Landing dimensions: The bottom landing often gets squeezed late in the design.
Height above grade: Check it at the deck and at the landing, because the site slope can change the guard requirements.
What should be on the drawings
A useful drawing set for stairs railing design should show more than a side sketch.
Plan view: Guard locations, stair opening, and post positions.
Stair section: Rise, run, and how the rail tracks the stair.
Guard elevation: Heights, infill spacing, and how the stair rail meets the landing rail.
Connection details: Especially where posts fasten at the stair stringer.
Questions that expose scope gaps early
A short checklist can save a lot of friction later:
Who supplies hardware: Don't assume it's included.
Does the railing match the existing deck colour and trim: “Close enough” usually isn't.
How is climbable geometry being avoided: Especially on contemporary designs.
How is winter exposure being handled: Ask about finish choices and impact-prone areas at the stair base.
Get the stair transition drawn before the deck surface goes on. It's much cheaper to erase a line than move a post.
Guelph Deck Builders handles the parts of stair railing projects that usually trip homeowners up: site measurement, material guidance, permit-ready drawings, and code-compliant installation for deck-to-stair transitions in cedar, composite, vinyl, and pressure-treated builds. If you're planning a new deck or replacing an awkward old stair rail, visit Guelph Deck Builders to see how your railing can be resolved before it turns into a framing compromise.
Comments