
Deck Board Installation How to Get Spacing and Finish Right

You've spent a weekend building a clean, inviting deck surface. The boards look straight, the colour is right, and the last screw is driven. Then an inspector points out inconsistent gaps, an unsupported board end, or a guard detail that doesn't meet Ontario requirements. Suddenly, the “finished” deck is back on the work list.
Good deck board installation starts before the first board touches the frame. In Guelph, the surface is part of a larger structural system affected by permits, joists, fasteners, drainage, guards, stairs, and winter moisture. Get those decisions right early, and the final finish looks better because it's built on something sound.
Table of Contents
Before You Lay a Single Board What to Check First - Inspect the frame, not just the finish
Laying Out Your Deck Boards for a Straight and Even Surface - Dry-fit the pattern before fastening - Keep the field clean around joints and obstacles
Fastening Spacing and Waterproofing That Lasts Through Winter - Protect the structure below
Common Mistakes That Ruin a Good Deck and How to Avoid Them - Surface problems that show up quickly - Details that protect the frame - Inspection mistakes beyond the boards
Your Final Inspection and Finishing Checklist for a Deck That Passes - Surface punch-list
Before You Lay a Single Board What to Check First
A homeowner once showed me a deck frame that looked usable at a glance. The joists were mostly straight, the ledger appeared secure, and the boards had already been delivered. A closer check found soft wood near the house, a few loose framing connections, and a layout that would have left awkward slivers along the far edge. Laying boards quickly would only have hidden the problems until the first wet season, or until inspection.
Permit status comes first. In Ontario, a building permit is required for a deck or exterior floor platform greater than 10 m², or 107.6 ft², and municipalities may also require one when the deck is attached to a dwelling or when its finished surface is more than 600 mm, or 24 inches, above grade. Ontario guidance also connects these projects with frost-resistant foundations, lateral bracing, and stairs and railings designed for people and snow loads. Ontario deck code guidance explains why a board replacement or new surface can't be separated from the structure beneath it.
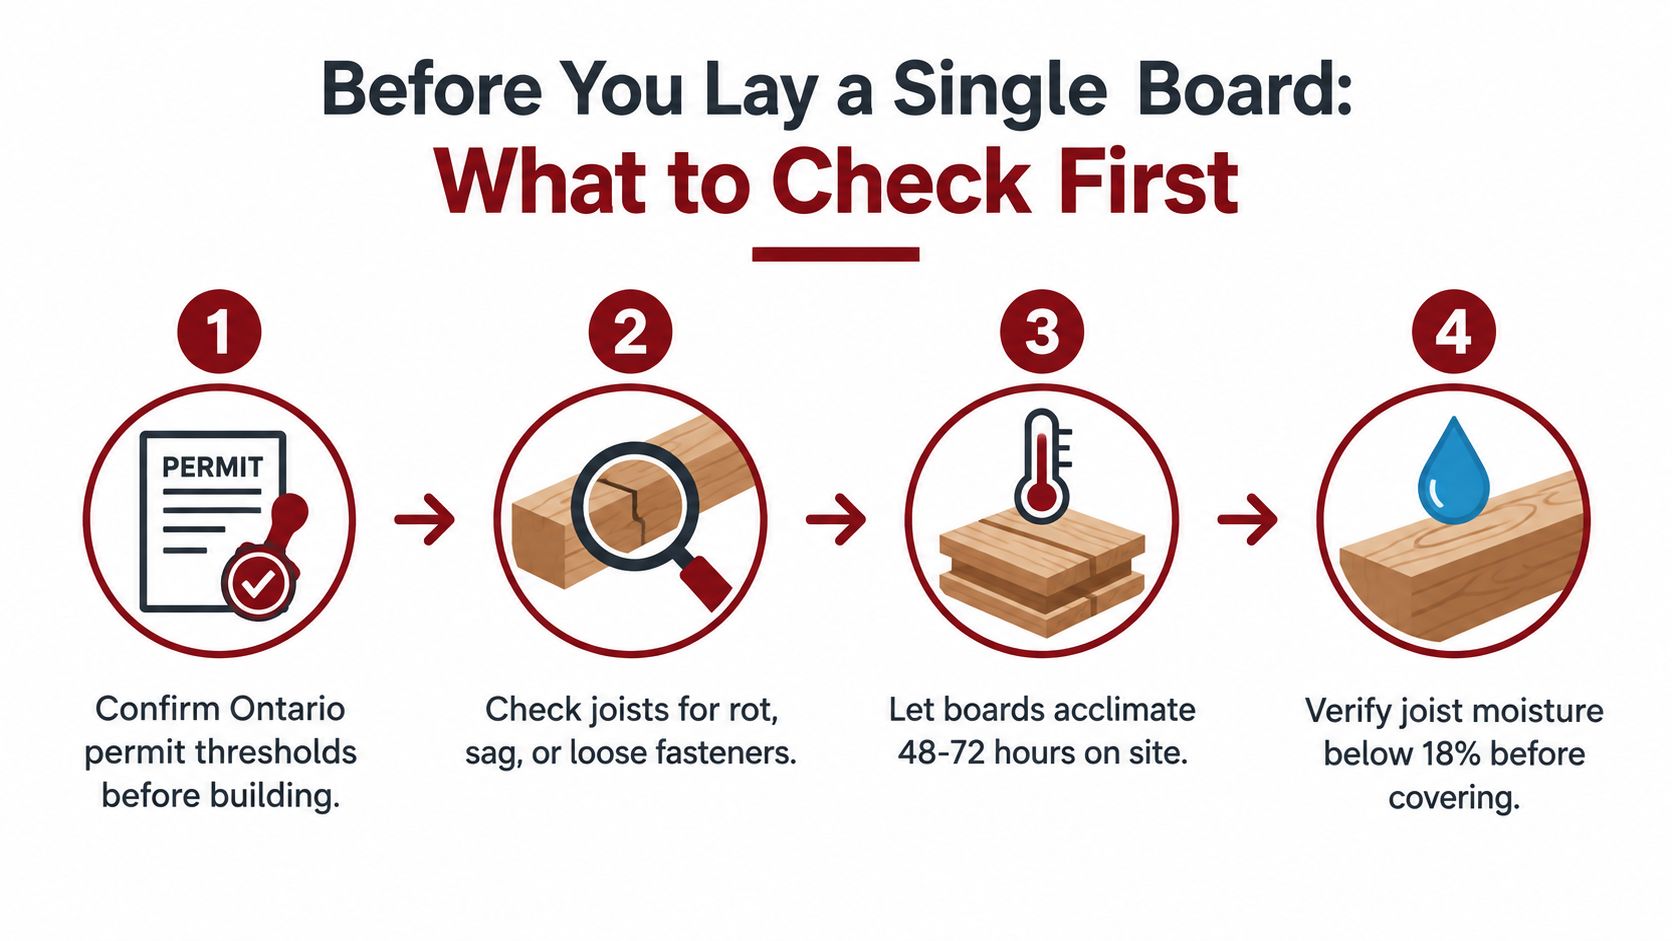
Inspect the frame, not just the finish
Run a straightedge across the joists and look for sagging, rot, twisted crowns, and fasteners that no longer bite. Check that the frame is square by comparing diagonal measurements, then examine the joist tops for uneven height. A deck board can't correct a crowned or dipping joist. It transfers that defect to the walking surface.
Moisture matters too. Boards should be stored flat, supported, and protected from ground contact while they adjust to the site. The supplied installation checklist calls for allowing boards to acclimate on site for 48 to 72 hours and verifying joist moisture below 18% before covering the frame. Treat those figures as part of the preparation routine, not as a substitute for the decking manufacturer's requirements.
Before cutting, organise exterior-grade, corrosion-resistant fasteners, a drill with a depth-controlled setting, a chalk line, a reliable square, a sharp saw blade, and spacers suited to the material. If you're unsure whether a damaged plank should be repaired or removed, this practical resource on when to replace vs refinish a plank can help frame that decision. For permit-ready drawings or structural repairs in Guelph, bring in a qualified deck professional before the surface conceals the evidence.
Laying Out Your Deck Boards for a Straight and Even Surface
The first board controls the appearance of the entire deck. If it starts out of line, every following row magnifies the error, especially beside a house wall, picture-frame border, or stair opening.
Begin by deciding where the visible edge matters most. On an attached deck, establish a chalk line parallel to the house, then align the first board to that line rather than trusting the wall itself. Older homes and framing additions are often slightly out of square. The chalk line gives you a deliberate reference, while the outer edge can be trimmed after the field boards are secured.
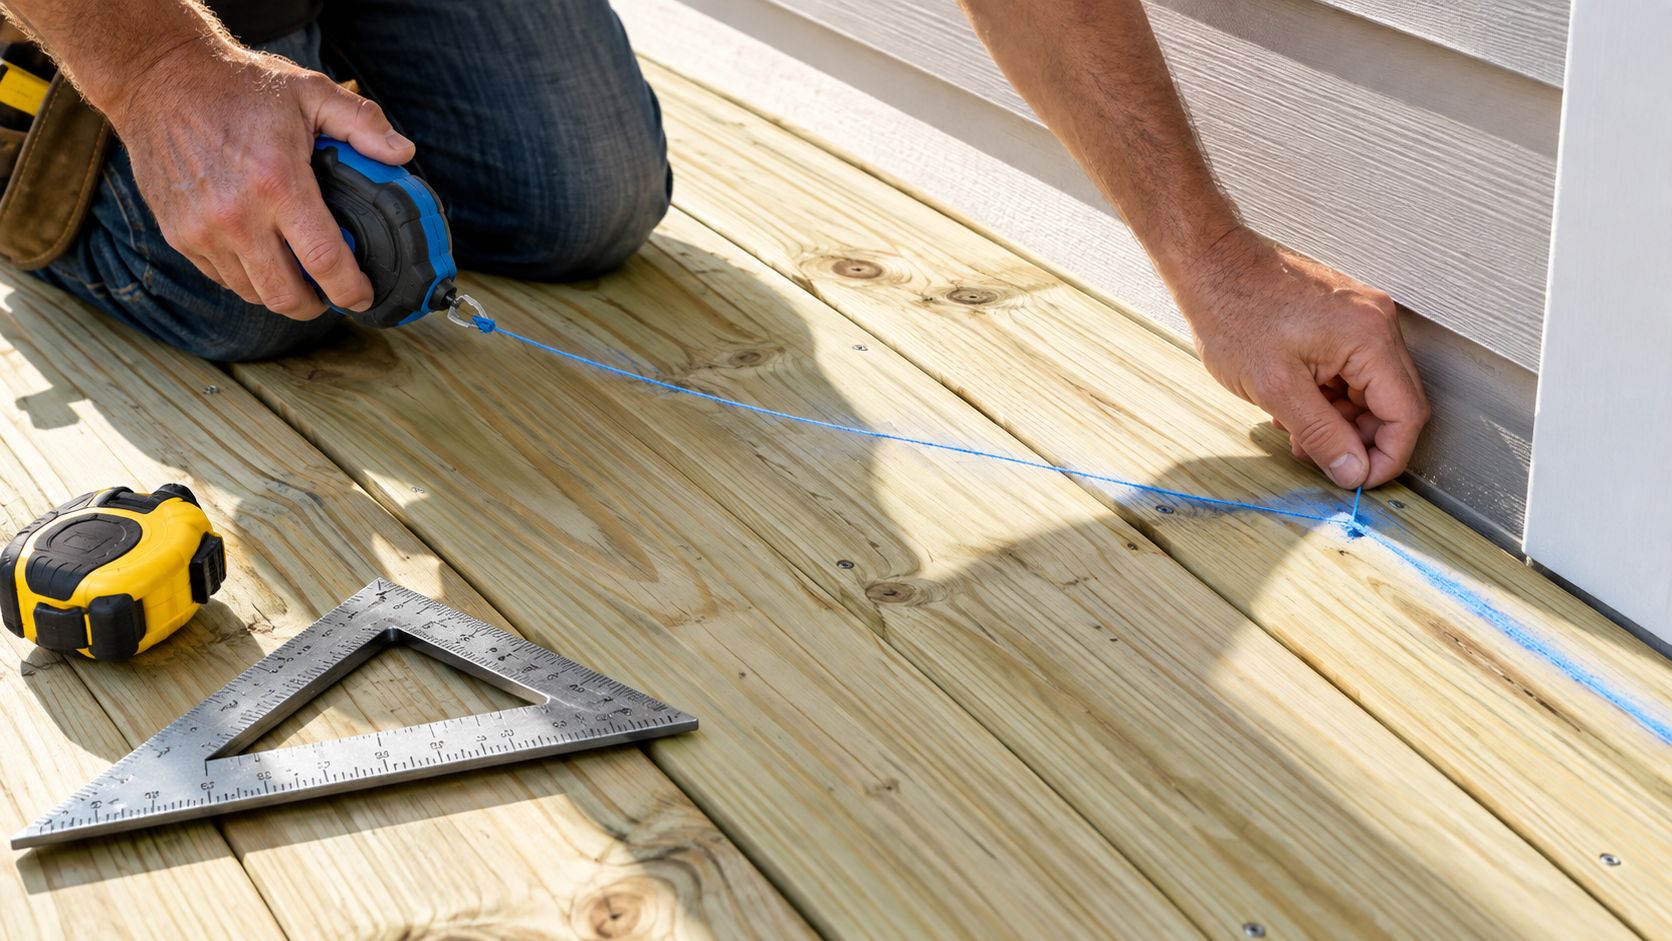
Dry-fit the pattern before fastening
Lay several boards across the frame without fixing them permanently. This reveals where end joints will land, whether the final row becomes too narrow, and how a breaker board or picture frame will affect the field. A small layout adjustment at this stage can prevent a distracting joint beside a stair post.
Keep board crowns facing consistently. A crowned board can be held down, while alternating crowns can create a wavy surface and uneven gaps. Use a straightedge often, and don't assume a board that looks straight from one end will stay straight across the full span.
Gaps need to be uniform, but the exact requirement depends on the decking product, board moisture, temperature, and manufacturer instructions. The supplied Ontario-region installation guidance specifically describes establishing the chalk line and using a repeatable fastening sequence. For broader layout ideas, this guide to finishing a deck offers useful context on board direction, edge treatment, and finishing details.
Keep the field clean around joints and obstacles
Every butt joint needs solid support. Add blocking or a dedicated sistered joist where required so each board end can be fastened without relying on a shared, unsupported edge. A breaker board can make joints look intentional and simplify a large surface, but it still needs proper support and movement space.
Posts, walls, and stairs deserve their own measurements. Scribe around fixed posts instead of forcing boards against them, and leave room for drainage and movement. At stairs, plan the nosing and riser relationship before the field is complete. For the framing dimensions that control your board span and support, review the deck joist spacing guidance before finalising the layout.
Trim the outer ends only after the field is secured. A guide board and a sharp blade produce a cleaner edge than trying to make every board perfect during installation.
Fastening Spacing and Waterproofing That Lasts Through Winter
A deck can have attractive boards and still fail early if water reaches the framing. In Guelph, snow, freeze-thaw movement, and repeated wetting expose weak fastening and unprotected joist tops quickly.
Start with the first board aligned to the chalk line. Drive two exterior-grade screws into every joist, placing them about three quarters to one inch from each board edge to reduce splitting and keep the rows visually consistent. Home Depot Canada's decking installation guidance sets out this layout and fastening approach.
The supplied installation visual calls for 1/8-inch gaps between boards, with fasteners kept one inch from board ends and joist tape or flashing placed over the joists before the boards go down. Follow the decking manufacturer's instructions where they differ, particularly with composite products that move with temperature.
Practical rule: A clean screw line is useful, but a screw driven too close to an edge can split the board and create an entry point for water.
Protect the structure below
Joist tape helps shield the top of the framing from water that sits beneath the boards. It won't repair rotten wood or replace proper ledger flashing. At the house, the ledger connection needs mechanical fastening, and the surrounding flashing must direct water away from the wall and framing.
Ontario-region guidance stresses corrosion control throughout the load path. Framing connections should use corrosion-resistant fasteners, and ledger attachment must use mechanical fastening rather than nails alone. Prescriptive deck designs commonly use 1/2-inch lag screws or bolts, while example tables tighten connection spacing from roughly 30 inches on-centre for a 6-foot deck to about 10 to 11 inches on-centre for a 16-foot deck as tributary load increases. This Ontario deck package provides the relevant connection guidance.
End cuts deserve attention. Seal exposed cuts in wood decking with a suitable exterior product, and make sure board ends land on framing or properly installed blocking. Don't leave a joint floating between joists. It will move underfoot, hold water, and make fasteners work loose.
Use spacers consistently rather than judging every gap by eye. Keep debris from packing between boards, and check that screw heads sit flush without being buried. A video demonstration can reinforce the visual sequence, especially for first-time installers.
Choosing Your Fastening Method and Material Without Regret
The right fastening method depends on what you value most. Face screws are visible, but they're straightforward to inspect, easy to replace, and practical for many cedar and pressure-treated installations. Hidden clips create a cleaner surface, though they require compatible board profiles, careful spacing, and access to the edge of each board during installation.
Material and Method | Best For | Watch Out For |
|---|---|---|
Cedar with face screws | Natural appearance and direct, familiar installation | Requires planned sealing and visible fastener lines |
Pressure-treated wood with face screws | Budget-conscious builds and repairable surfaces | Boards can move, split, or weather unevenly if preparation is poor |
Composite with hidden clips | Low-maintenance surfaces and uninterrupted visual lines | Manufacturer-specific clips and movement allowances matter |
Composite with colour-matched face screws | Stronger control at selected locations and easier board replacement | Fastener placement remains visible |
Vinyl decking with its approved system | Homeowners focused on a clean, low-upkeep finish | Follow the product system closely, since generic wood methods may not apply |
Cedar feels warm and traditional, but it asks for an ongoing finishing plan. Pressure-treated wood usually makes sense where initial material cost and easy repair matter more than a uniform long-term colour. Composite is attractive for families who want less routine staining and sealing, provided the frame, clips, and ventilation are installed correctly.
A hidden fastener can improve the appearance, but it won't compensate for a twisted joist or poor board layout.
For composite projects, compare the manufacturer's clip system before buying boards. The hidden fastener composite decking guide is useful when you're weighing a cleaner surface against the installation discipline those systems require. Face fastening remains the more forgiving choice for local repairs because an individual board can be removed without disturbing a large section of the deck.
Vinyl deserves separate attention. It can provide a low-maintenance walking surface, but it isn't interchangeable with cedar or composite boards. Use the approved fastening and edge details for that product, especially around stairs, perimeter trims, and penetrations.
Common Mistakes That Ruin a Good Deck and How to Avoid Them
Most deck failures don't begin with a dramatic structural event. They start with a small shortcut, such as forcing boards tight, skipping protection over the joists, or assuming a screw line doesn't matter because the surface will be furnished.
Surface problems that show up quickly
Tight gapping traps water. Boards need room for drainage and material movement. If the product allows it, use a consistent spacer rather than a random scrap of wood. Composite boards must follow their manufacturer's side and end-gap requirements.
Unsupported butt joints flex. A joint that lands between joists may feel acceptable on installation day, then loosen as the boards move. Add blocking or a separate support member so every end has a proper fastening base.
Alternating crowns create a rolling surface. Sight down the boards before fastening and orient crowns consistently. If a board won't sit flat without excessive force, replace it or correct the framing instead of burying the problem under screws.
Details that protect the frame
Skipping joist tape or flashing leaves the framing vulnerable wherever water rests beneath the boards. Seal exposed wood cut ends promptly, and don't treat a surface coating as a substitute for directing water away from the ledger and house wall.
Inconsistent screw lines make even high-quality boards look improvised. Mark the joist positions, use a chalk line where appropriate, and keep the same edge distance across the field. Overdriving screws is just as unhelpful as leaving them proud. Both mistakes damage the board surface and create places for water and debris to collect.
Inspection mistakes beyond the boards
A beautiful surface can still fail inspection if the guard and stair details are wrong. Ontario requires guards when the walking surface is more than 600 mm above adjacent grade, with minimum heights of 900 mm where the height difference is not more than 1,800 mm, and 1,070 mm where it exceeds 1,800 mm. Ontario's building code regulation sets out those thresholds.
Guard openings must not exceed 4 inches, and the design must avoid climbable members, attachments, or openings between 5.5 inches and 35 inches above the deck surface. Stair handrails are required when stairs have more than three risers, according to Ontario guard and stair guidance. Measure the finished surface, not the rough framing, before setting posts and railings.
Your Final Inspection and Finishing Checklist for a Deck That Passes
Before calling the deck complete, walk it slowly in daylight and inspect it as both a homeowner and an inspector. Look across the surface from several angles. Uneven rows, proud screws, unsupported joints, and inconsistent perimeter gaps stand out more clearly when you're not focused on the next task.
Surface punch-list
Check the gaps: Confirm they're consistent, open for drainage, and appropriate for the material.
Check the fasteners: Look for missing screws, split boards, loose heads, and fasteners that have been driven too far.
Check the edges: Make sure end cuts are clean, supported, and sealed where required.
Check the borders: Picture frames and breaker boards should sit securely without pinching the field boards.
Check the stairs: Confirm the nosing, risers, landings, and handrails feel solid and align with the approved design.
Guard height deserves a tape measure, not an estimate. For an exterior guard serving one dwelling unit, the 900 mm allowance applies only when the walking surface is not more than 1,800 mm above finished ground level. Above that height, the minimum is 1,070 mm, as explained in Ontario guard-height guidance. Check openings and climbing details before the inspection is scheduled.
For wood, sand sharp edges and follow the coating manufacturer's preparation requirements before staining or sealing. Composite and vinyl generally need cleaning suited to the product rather than a wood stain. Keep snow from building against doors, drains, and railings, and inspect the surface after winter for movement, lifted fasteners, or trapped debris.
If the deck required a permit, keep the drawings, product instructions, and inspection records together. If the frame, guards, or ledger still raise questions, arrange a professional review before using the deck heavily.
Guelph Deck Builders can assess the frame, prepare permit-ready drawings, help select cedar, composite, vinyl, or pressure-treated materials, and complete board installation with code-conscious fastening and finishing details. Visit Guelph Deck Builders to arrange an on-site consultation for a deck surface that looks right and performs through Ontario weather.
Comments