
Outdoor Stairs Kit Buyer's Guide for Canadian Homeowners

You usually start searching for an outdoor stairs kit at a mildly annoying moment. The deck is finally built and there's still no safe way down. Or you've stepped on a soft tread, looked at the cracked landing below, grabbed a tape measure, and realised the old stairs were slapped together years ago and don't belong there anymore.
That's where people split into two camps. One group wants a kit because it feels simple, fast, and controlled. The other starts sketching custom stairs because the yard is sloped, the deck height is awkward, or nothing off the shelf seems like it'll land where it should. Both instincts are reasonable.
My blunt take is this. A good outdoor stairs kit can save time and hassle on the right site. On the wrong site, it just disguises a custom stair job until you're halfway through the install and spending money fixing a “simple” purchase.
Table of Contents
Why Homeowners Start Searching for an Outdoor Stairs Kit - The appeal is obvious - What actually decides the right choice
The Main Types of Outdoor Stairs Kits on the Market - Wood kits suit wood decks - Metal kits solve some problems and create others - Concrete is brutally practical
Sizing and Load Rules Every Kit Has to Respect - The geometry has to work first - Handrails and guards trigger sooner than people expect - Why kits fail in the field
Kit vs Custom Built Stairs - When a prefab kit is the smart buy - When custom stops the bleeding - My opinion after seeing both go sideways
How to Match a Kit to Your Deck and Site - Start with total rise and landing reality - Five checks I'd do before ordering - Know when to bring in help
What Installation Actually Looks Like - The part that goes smoothly - The part that usually doesn't - Where hiring half a day pays off
Cost Ranges and Where the Money Goes - What drives the quote - The line items people miss - How to sanity-check a quote
Which Path Fits Your Project Best - The easy yes for a kit - The projects that should go custom - My shortlist for making the call
Why Homeowners Start Searching for an Outdoor Stairs Kit
They aren't browsing stair kits for fun. They're solving a problem that's suddenly hard to ignore.
Maybe the old wood treads are checking and spongy near the bottom. Maybe you replaced deck boards and the stairs now look like the weak link. Maybe you never had proper access to the yard and you're tired of stepping down off the deck like it's a loading dock. That's usually when an outdoor stairs kit enters the conversation.
The appeal is obvious
A kit promises three things homeowners like:
Speed: Parts arrive pre-cut or pre-engineered, so you're not laying out stringers from scratch.
Predictability: You can usually see the pieces, the finish, and the rough install method before you commit.
Less guesswork: If the kit is designed properly, you're starting from an organised system instead of a pile of lumber.
That's the sales pitch, anyway. The catch is that your yard doesn't care about the sales pitch.
Every site has its own rise, run, landing conditions, drainage issues, and connection points at the deck frame. If the stair opening is tight, the grade slopes away, or the bottom landing isn't level, a stock kit can stop being convenient in a hurry.
Practical rule: Buy the stair to fit the site, not the other way around.
What actually decides the right choice
Before you order anything, sort the decision through these filters:
Site fit Does the kit match your actual deck height and landing footprint?
Ontario code Can it meet local stair, handrail, and guard rules without awkward modifications?
Winter behaviour Will the treads stay usable through wet leaves, freeze-thaw, and icy mornings?
Install reality Can you assemble and anchor it properly, or are you really buying a contractor job in a box?
If you want more practical building content beyond stairs, it's worth taking a few minutes to browse the Central Valley building blog. It's useful for seeing how material choices and exterior details affect long-term maintenance, which is exactly the trap many stair-kit buyers miss.
The Main Types of Outdoor Stairs Kits on the Market
Not all kits are built for the same climate, the same deck, or the same homeowner. In Canadian conditions, especially around Ontario, material choice matters as much as layout.
Here's the short version first.
Material | Freeze-Thaw Performance | Typical Lifespan | Best Use Case |
|---|---|---|---|
Pressure-treated wood | Fair if maintained well; vulnerable at cut ends and ground contact | Varies with upkeep and drainage | Matching an existing wood deck on a straightforward backyard run |
Cedar or hardwood | Better appearance, but still affected by moisture cycling | Varies with sealing and exposure | Premium wood look where appearance matters more than low upkeep |
Galvanized or powder-coated steel | Strong in winter, but coating damage can lead to rust creep | Good when coating stays intact | Tight side yards, narrow profiles, modern decks |
Aluminum | Strong performer against corrosion and moisture | Good for long-term low upkeep | Lakeside, exposed, or wet sites where rust resistance matters |
Precast concrete | Excellent if made and set properly | Long-lasting in hard-use areas | Basement walkouts, utility access, heavy traffic |
Wood kits suit wood decks
Pressure-treated wood kits are the default for many homeowners because they're familiar. They also blend well with pressure-treated decks, which matters if you don't want your stairs looking like an afterthought.
The problem is maintenance. Wood moves, dries, swells, and takes a beating where the stringer meets the pad or concrete base. In Ontario winters, repeated freeze-thaw can open up checks, hold water in cut areas, and start the long slide toward rot if drainage is poor.
Cedar and hardwood kits look better, but they don't escape the same basic truth. Exterior wood stairs still need care. If you won't seal, inspect, and replace worn components as needed, don't buy a wood kit because it looked nice in the showroom.
Metal kits solve some problems and create others
Steel kits look clean and compact. They're a smart fit in side yards, urban lots, and decks where a bulky wood stair would eat too much space. If you want slim lines and a more architectural look, steel gets you there.
But steel has one weak spot homeowners underestimate. Any damaged coating, exposed fastener area, or field-cut edge can become the starting point for rust. In a wet climate, that matters.
Aluminum is the low-fuss cousin. It's lighter to handle, more forgiving around moisture, and a good call where corrosion is the big concern. The trade-off is feel and look. Some aluminum systems have limited tread options or a more utilitarian appearance than homeowners expect.
Don't choose metal because it sounds permanent. Choose it because the finish, fastening, and site conditions actually support a long outdoor life.
Concrete is brutally practical
Precast concrete stair systems aren't glamorous, but they work. If you need hard-wearing basement access or a durable stair in a high-traffic area, concrete deserves more attention than it gets.
The drawbacks are obvious. It's heavy, awkward to deliver, and not a casual DIY weekend project. Poorly cured or poorly installed concrete can also suffer surface spalling over time, especially when water sits where it shouldn't.
If you're ranking these for Ontario conditions, I'd put aluminum and properly protected metal high for low upkeep, wood high for visual match on timber decks, and concrete high for utility and durability where appearance comes second.
Sizing and Load Rules Every Kit Has to Respect
A lot of homeowners get tripped up. They shop by look, then by price, and only later find out the geometry doesn't work.
For Ontario residential deck stairs, the dimensions are not optional. The common standards used in residential guidance set minimum stair width at 860 mm, risers between 125 mm and 200 mm, and treads between 255 mm and 355 mm under Ontario deck stair guidance. The same guidance also requires guards where the walking surface is more than 600 mm above adjacent ground or another surface.
The geometry has to work first
If the total rise from grade to deck surface doesn't divide cleanly into consistent risers, stop there. Don't “make it work” by fudging the bottom step. Stair dimensions must stay consistent through the full flight, with only very small tolerances allowed between adjacent steps in the same Ontario guidance.
That one rule knocks out a surprising number of stock kits on real sites.
Bottom line: If the rise and run don't land cleanly, the kit is wrong even if the material and price look right.
For a practical local breakdown of how these measurements are used on residential projects, this Ontario deck stair code overview is worth reviewing before you order parts.
Handrails and guards trigger sooner than people expect
Ontario residential deck stair guidance sets handrail height at 800 mm to 965 mm and limits guard openings to no more than 100 mm in this deck stair code summary. Separately, Ontario deck guidance states that handrails are required on stairs with more than 3 risers, and guards are required where the walking surface is more than 600 mm above adjacent ground or deck surface in this municipal deck guide.
That means many homeowners who think they're “just replacing the steps” are replacing the rails too.
Why kits fail in the field
The most common mistake isn't usually the tread. It's the assembly around it.
A stair kit can look code-friendly on paper and still fail the job if:
The width comes up short once trim or side framing is installed
The railing package is decorative only and not built to the required dimensions
The stringer layout assumes a perfect landing that your yard doesn't have
The guard infill leaves gaps too wide for the 100 mm opening limit
If a kit can't be adjusted without breaking those rules, skip it. That's not a bargain. That's a return trip to the supplier and a delayed project.
Kit vs Custom Built Stairs
This is the decision. Not wood versus steel. Not black rail versus white rail. Kit versus custom.
A prefab kit works when your site behaves itself. A custom stair works when the site has opinions.
When a prefab kit is the smart buy
Kits make sense when the stair run is straight, the rise is ordinary, the landing is level, and the deck connection is simple. In that situation, you can save labour, keep the parts list tighter, and avoid paying a carpenter to reinvent a layout that already exists in a box.
They also help homeowners who want a cleaner planning process. You can review components up front, confirm the guard and handrail package, and make a faster yes-or-no decision.
When custom stops the bleeding
Custom-built stairs earn their keep when the site is irregular. That includes sloped grade, awkward deck heights, bottom landings that need shaping, or layouts where the stairs have to turn, widen, or tie into other rail sections cleanly.
A custom build also makes more sense if you care about visual integration. Kits can look decent. Custom stairs can look like they belong to the deck.
Factor | Prefab Kit | Custom Built |
|---|---|---|
Site fit | Best on straight, simple layouts | Best on awkward or non-standard sites |
Adjustment room | Limited to the kit's system | Built to the exact rise, run, and landing |
Permit friction | Easier if the geometry already complies | Easier when the site needs exact drawings |
Material flexibility | Limited to manufacturer options | Broader choices in structure and finish |
Long-term maintenance | Depends on kit quality and finish details | Depends on design, detailing, and material choice |
Resale perception | Fine when it looks integrated | Usually stronger when it's clearly purpose-built |
My opinion after seeing both go sideways
Kits save money when the deck and yard are already suited to a stock stair. They waste money when you buy them for a custom problem and then pay someone to alter, shim, patch, and rebuild around the system.
If the stairs need to solve grade, drainage, landing shape, and rail transitions all at once, custom is usually the cleaner answer. If the job is plain and square, a good kit is hard to argue against.
How to Match a Kit to Your Deck and Site
The measuring stage decides whether this project goes smoothly or turns into a return-and-reorder mess. Don't order first and “make it fit” later.
Start with total rise and landing reality
Measure from finished grade to finished deck surface. That's your total rise. Then work backward into a stair layout that stays inside the Ontario residential stair range already covered earlier.
What matters here isn't just step count. It's whether the final stair lands on a surface that's stable, level, and worth building on.
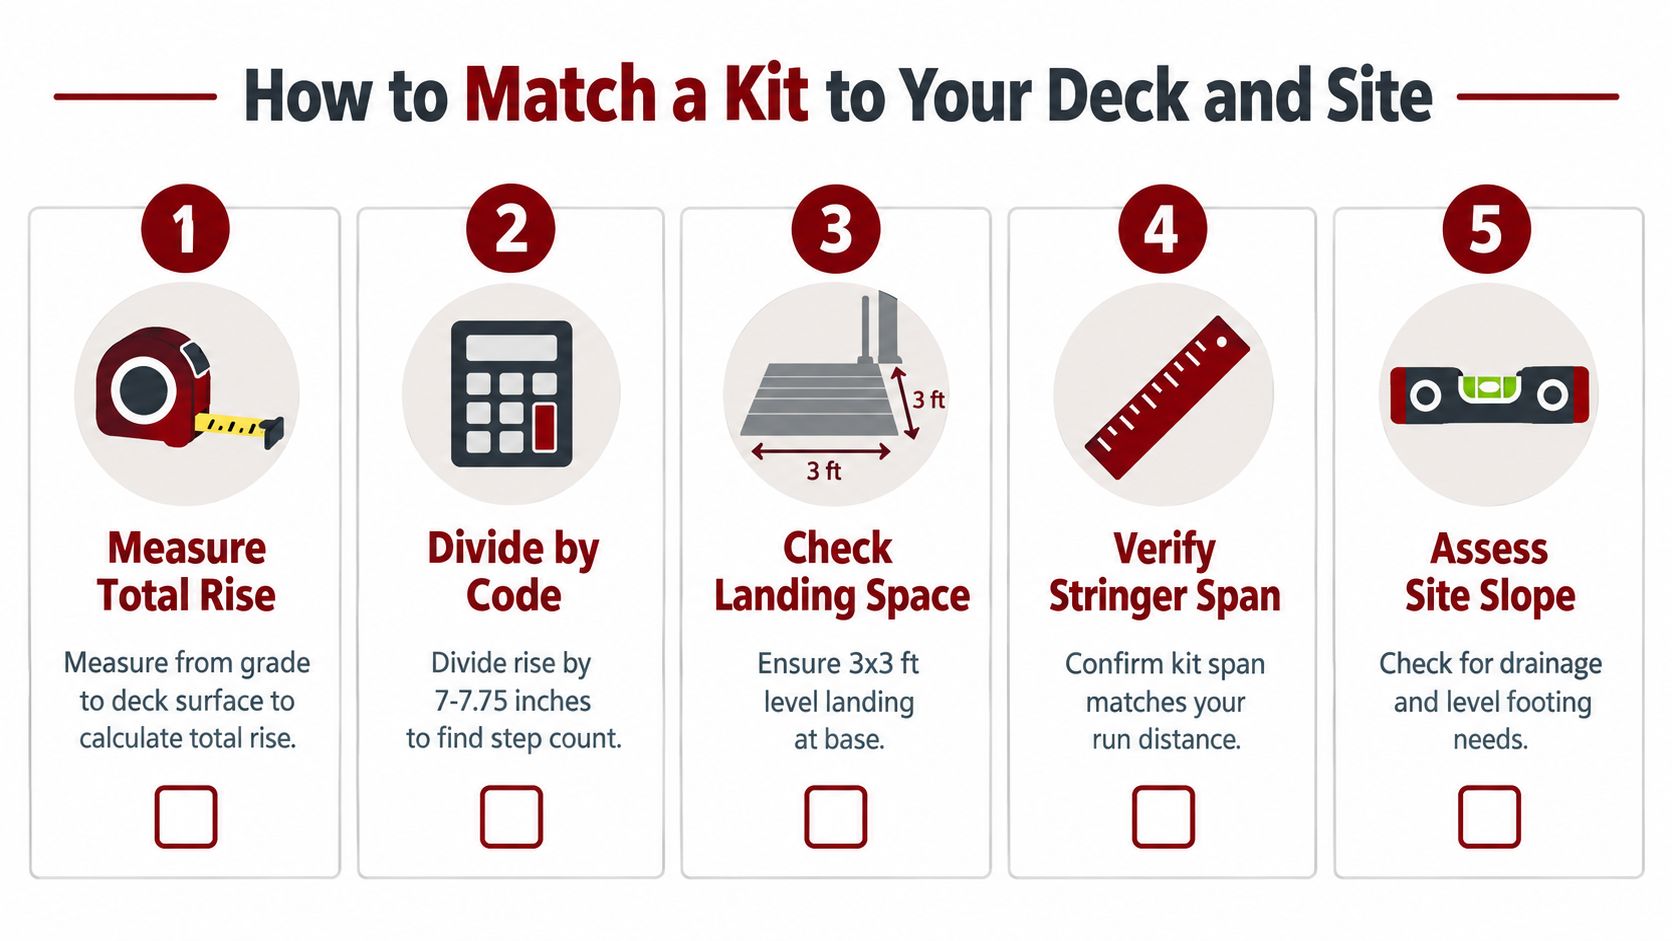
If the bottom landing is soft, sloped, or washes out in spring, the stair will never feel solid no matter how nice the kit is.
Five checks I'd do before ordering
Measure the rise twice Use finished surfaces, not rough grade you plan to change later.
Map the run on the ground Put stakes or spray paint where the stair will sit. Homeowners often discover too late that the run blocks a gate, door swing, or walkway.
Check the top connection Confirm where the stair fastens to the deck frame, not just the decking surface.
Look at water movement Exterior stairs need slip-resistant surfaces, and Ontario guidance says ramp and stair surfaces must have a slip-resistant finish under this municipal slip-resistance guidance. That matters even more if the landing area stays wet or ices up.
Assess the base material Concrete pad, compacted base, and hardscape all behave differently. If you're pairing stairs with a finished hardscape surface, looking at durable exterior stone choices such as these low-maintenance parking marble options can help you think through how the bottom landing will wear and shed water over time.
A stair kit doesn't land on “the yard.” It lands on one exact patch of ground. If that patch is wrong, the whole stair feels wrong.
Know when to bring in help
This is also the point where professional assessment earns its keep. A company like Guelph Deck Builders can handle site measurement, material guidance, permit-ready drawings, and stair planning for homeowners who don't want to guess at the fit.
That's not always necessary. On a dead-simple deck, a careful DIYer can do this well. But if your grade is uneven or your landing ties into other outdoor work, spend the time to get the layout right before the order goes in.
What Installation Actually Looks Like
The average homeowner imagines a stair kit install as a clean Saturday job. Delivery in the morning, stairs by dinner. Sometimes that happens. More often, the sticking points show up once the stringers come out of the truck.
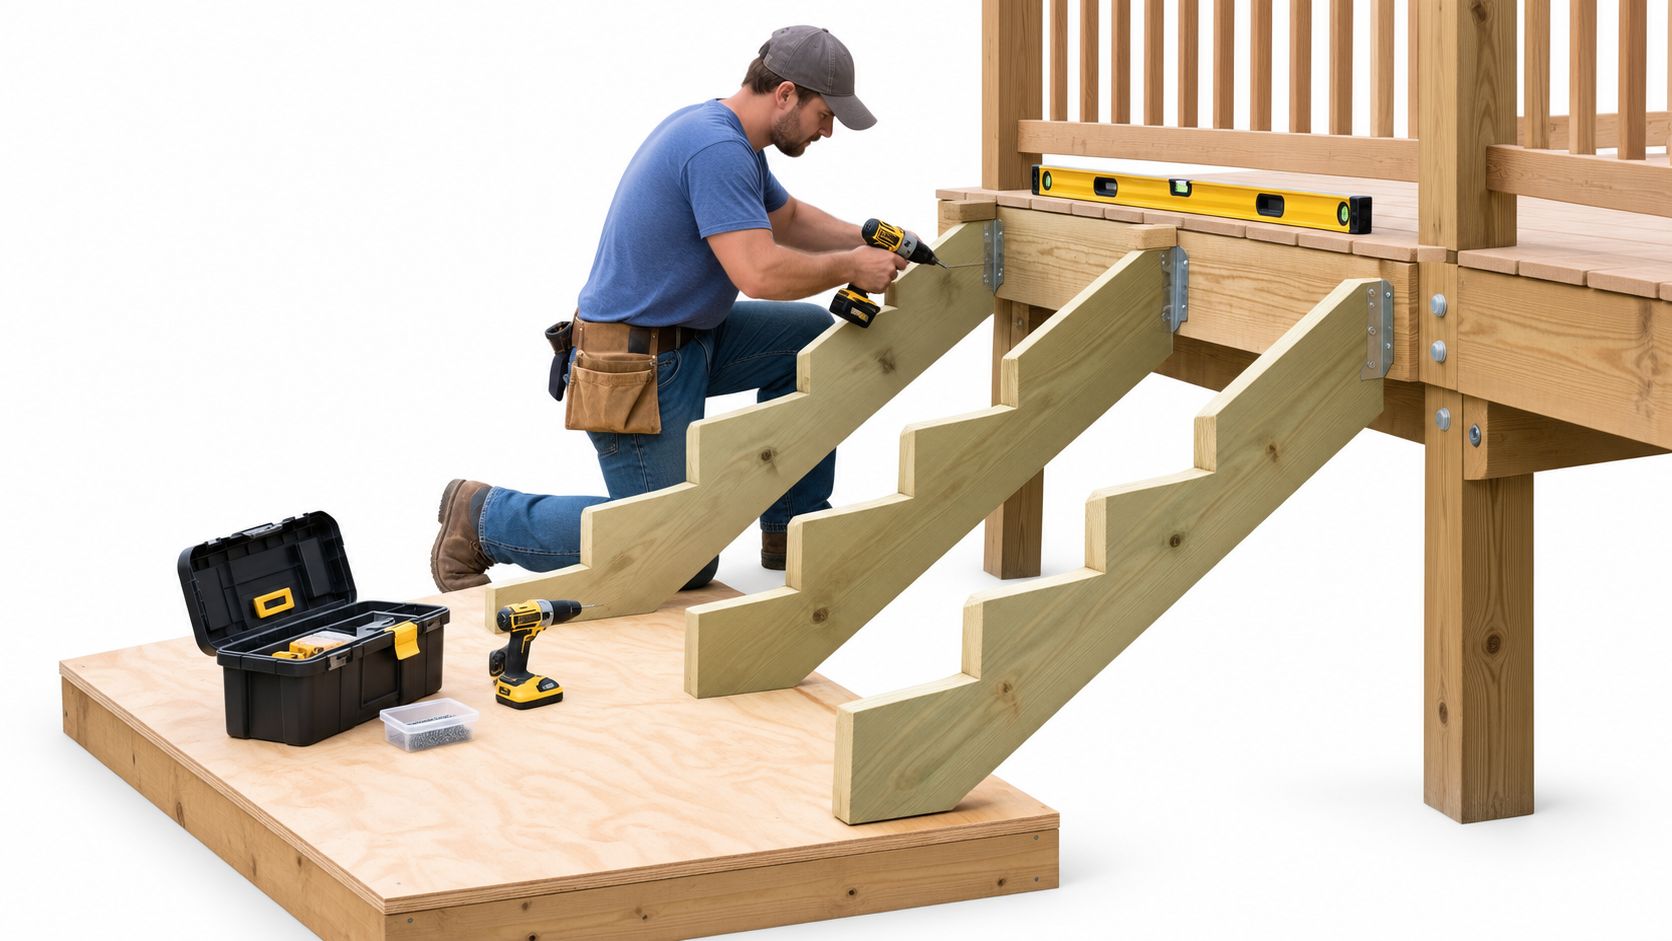
The part that goes smoothly
You unpack the components, check the hardware, confirm the left and right stringers, and dry-fit the top bracket location. On a level site with a straightforward deck edge, that part is manageable.
Then the treads go on, the alignment starts to show, and things still feel under control.
The part that usually doesn't
The trouble starts at the ground. One side of the landing is high. The deck frame is a touch out of level. The bottom step comes in wrong because the actual grade wasn't as flat as it looked from the patio door.
That's when kit assembly turns into carpentry.
Common slowdowns include:
Shimming on uneven support points so the stair doesn't rock
Squaring the top attachment against a deck that isn't perfectly true
Anchoring into concrete or pavers without blowing out edges or creating a weak connection
Correcting the last rise when finished grade differs from the original assumption
If you want a useful visual on traditional framing details and stair layout, this deck stairs construction guide is a good reference before you start cutting or fastening anything important.
Most bad-looking stairs aren't ruined by the tread material. They're ruined by a rushed top connection and a sloppy base.
A second set of hands helps more than people think. Not because the work is mysterious, but because long components, rail sections, and repeated level checks are awkward alone.
Here's a walkthrough that shows the rhythm of a typical build and why sequencing matters before rails go on:
Where hiring half a day pays off
If you're comfortable with basic assembly but less sure about structural attachment, hire out the stringer set and final rail tie-in. That's usually the smartest compromise.
You can handle unpacking, finish prep, and even tread installation if the system is straightforward. But the top and bottom connection points decide whether the stair feels solid for years or annoying forever.
Cost Ranges and Where the Money Goes
The honest answer on cost is boring but useful. The stair itself is only part of the bill. The landing, rails, delivery, and correction work often swing the number more than the kit category does.
What drives the quote
Here's the cleaner way to compare options. Think in terms of system complexity, not just material.
Kit Type | Material Cost Range | Cost Drivers That Push the Quote Up |
|---|---|---|
Pressure-treated wood kit | Lower end of the market | Extra stringers, better treads, base prep, rail package |
Steel stringer kit with wood treads | Mid-range | Finish quality, custom tread choice, heavier rail system |
Aluminum or galvanized steel panel system | Higher than basic wood | Factory finishes, matching guards, freight, specialty brackets |
Modular precast concrete | Higher material and handling burden | Delivery logistics, equipment, landing prep, access constraints |
I'm not listing hard price bands here because they vary wildly by supplier, freight, finish package, and site demands, and there's no verified project-wide pricing data I can responsibly pin down beyond broad categories. What matters more is understanding why one quote jumps while another doesn't.
The line items people miss
Homeowners usually focus on treads and stringers. Suppliers and installers focus on the details that decide whether the number holds.
Watch these line items closely:
Guard and handrail package This is a major one. If the base kit doesn't include a code-compliant rail setup, your “cheap” stair won't stay cheap.
Landing or pad work A stable base costs money even when the stairs themselves are simple.
Freight and handling Heavy or long stair components can be surprisingly expensive to move.
Site correction labour If the yard, deck edge, or landing needs adjustment, labour rises fast.
Finish upgrades Better treads, coating upgrades, and trim details add cost but may save maintenance later.
How to sanity-check a quote
Ask three questions.
How much total rise is this quote covering? More rise means more stair, more rail, more labour.
How many treads and stringers are included? This tells you whether the structure matches the visual rendering.
Is the landing included or assumed? That one omission causes a lot of sticker shock halfway through a job.
If a quote looks suspiciously low, it usually excludes something boring and necessary. Railings. Base prep. Anchoring. Permits. Those are the parts that turn a number from marketing into a real installed stair.
Which Path Fits Your Project Best
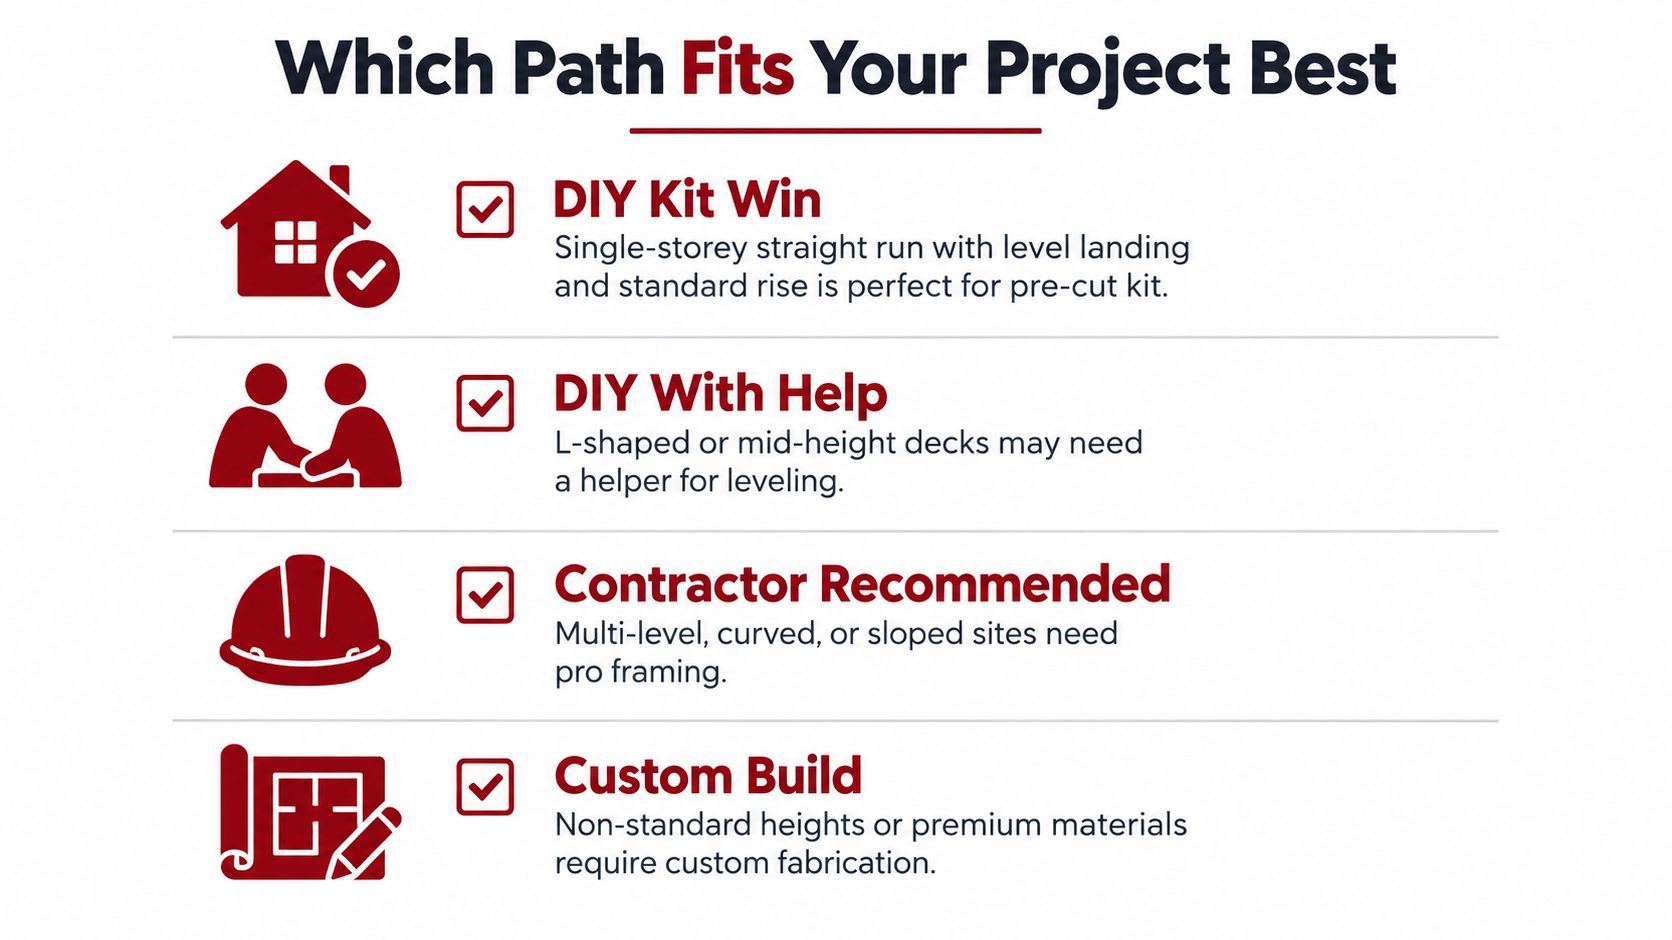
By the time you've measured the rise, checked the landing, and looked at the site, the right answer is usually not complicated.
The easy yes for a kit
If you have a single-storey deck, a straight run, a level bottom landing, and no weird side constraints, buy the kit. That's the sweet spot.
A pressure-treated setup works if you want visual continuity with a wood deck and you accept the maintenance. Aluminum or protected metal makes sense if low upkeep matters more than a perfect timber match.
The projects that should go custom
If the deck height is awkward, the grade slopes, the landing needs to turn, or the rail system has to integrate with an existing layout, go custom. Don't try to force a prefab answer into a custom geometry problem.
Ontario's broader code framework also limits stair slope to 45 degrees from horizontal, caps riser height at 210 mm, and requires treads at least 220 mm wide exclusive of nosing under the Ontario Building Code regulation. On accessibility-oriented exterior paths of travel, Ontario rules become more specific, including slip-resistant treads, uniform risers and runs, closed risers, tonal-contrast nosings, tactile walking surface indicators, and handrails on both sides, with rise set at 125 mm to 180 mm and run at 280 mm to 355 mm under Ontario accessibility requirements. A lot of stock kits aren't built with that level of detail in mind.
My shortlist for making the call
Use this checklist and be strict with yourself:
Rise: Does the total height divide cleanly into a compliant stair?
Run: Do you have enough yard space for the full projection?
Landing: Is the bottom surface level, stable, and drained?
Permit and code: Will the guards, handrails, and openings pass review?
Budget: Are you pricing the whole system, not just the visible parts?
Timeline: Do you want fast assembly, or do you need a stair that solves a difficult site properly?
One more safety detail matters on family decks. Ontario guidance sets guard height at 900 mm minimum where the elevation difference is not more than 1,800 mm, and 1,070 mm where the difference exceeds 1,800 mm in this deck guide. Guard openings also have to prevent the passage of a 100 mm sphere under this stair safety reference. If a kit skimps on the guard package, walk away.
For winter-heavy sites, I'd also favour systems that take slip resistance seriously. Ontario guidance for exterior stairs and landings ties performance to slip resistance and keeping surfaces free of ice and snow accumulations where applicable under this Ontario regulation summary. That's not a finish detail. That's daily usability in January.
If your project is simple, a kit is a solid call. If the site is fussy, custom will usually cost less than pretending it isn't.
If you want help sorting out whether an outdoor stairs kit will fit your deck, Guelph Deck Builders handles site assessment, permit-ready drawings, material guidance, and code-compliant stair construction for homeowners in Guelph and nearby communities. If you'd rather get a clear answer before ordering the wrong system, visit Guelph Deck Builders.
Comments