
Deck Attached to House Code Explained for Safe Builds

You're standing beside the back door, looking at a small platform that would make morning coffee easier and family dinners more enjoyable. The design seems simple, but the moment the deck connects to the house, deck attached to house code becomes a structural, safety, permit, and zoning question. A modest-looking deck can still need municipal review because the connection makes it part of the building system.
That's where homeowners often get stuck. They know to ask about a permit, but they may not realise that the answer is tied to the ledger, the height above grade, guard requirements, stairs, footings, and the distance from property lines. A deck can satisfy one requirement and still need changes to meet another.
Table of Contents
When Permits Are Required for Attached Decks in Ontario - What permit drawings should show
Ledger Attachment and Flashing Requirements You Must Know - Read the wall as a system
Footings Beams and Structural Load Paths Explained - Why layout decisions affect the ground - Connections deserve the same attention as lumber
Guard Height Strength and Safety Rules for Raised Decks - Height is only one part of the check
Stair Geometry Landings and Handrail Compliance - Check the stair run before the build - Guards and handrails use different measurements
Zoning Setbacks Lot Coverage and Municipal Expectations - Put the site plan ahead of the wish list
Quick Reference Lookup for Attached Deck Code Decisions - Attached Deck Code Quick Decision Matrix - A permit-ready conversation checklist
Introduction to Deck Attached to House Code Essentials
A homeowner in Guelph may picture a modest platform outside the kitchen, only slightly above the yard. Once that platform connects to the principal dwelling, approval depends on more than its size. The ledger becomes part of the house's load path, guards and stairs must protect users, and the deck must fit the lot's zoning limits. These pieces work like one approval system, each checking a different risk.
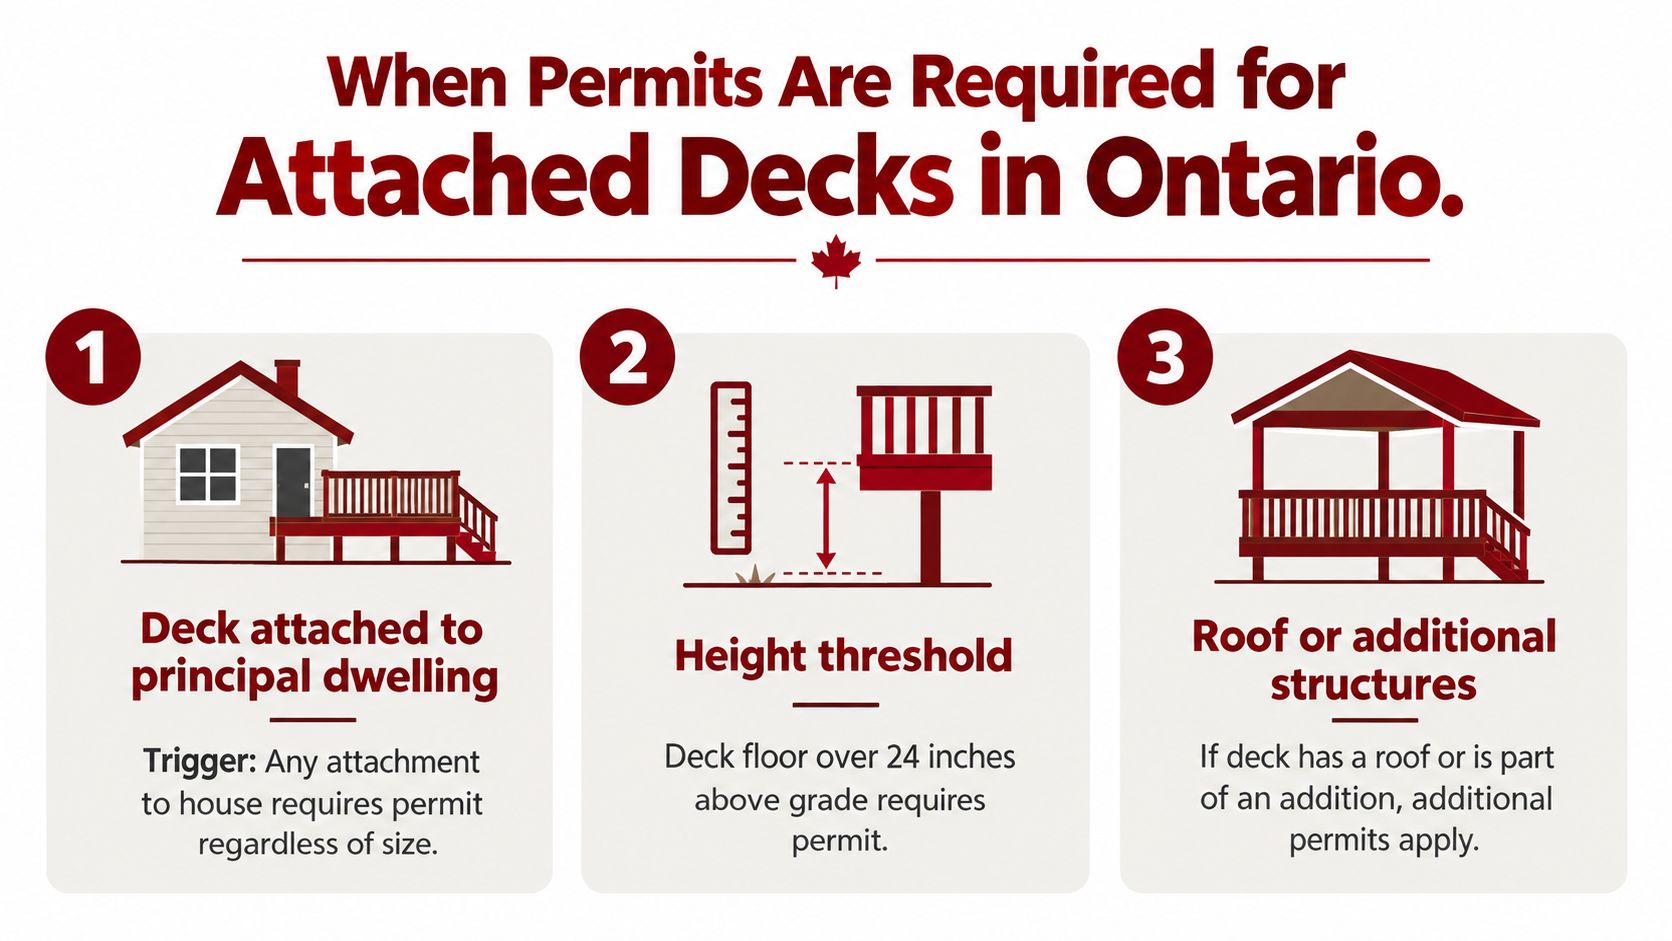
In Ontario, any deck attached to the principal dwelling requires a building permit, whether covered or uncovered and regardless of size, according to Guelph's deck and porch permit guidance. Guelph generally also requires a permit when any portion of the walking surface is 600 mm, or 24 inches, or higher above finished grade, including certain structural changes to an existing deck or porch at that height.
Practical rule: Start with the attachment, then test the design against height, ledger support, guards, stairs, and zoning setbacks.
A permit decision is only the first checkpoint. The ledger must transfer deck loads safely into the house, guard details must suit the deck's elevation, and setbacks determine whether the proposed footprint and stairs fit the property. A design that passes one checkpoint can still require changes at another.
Use this guide as a working reference. Check permit thresholds before finalising plans, review ledger and load-path details with the drawings, and confirm guard and stair requirements as the layout develops. Zoning deserves early attention on narrow lots, covered decks, or designs that bring stairs close to a property line.
For broader outdoor layout ideas, homeowners can review the Premier Gardens deck and patio resource. Its planning ideas do not replace Guelph or Ontario approval requirements, so confirm project-specific details with the municipality before ordering materials or beginning demolition.
When Permits Are Required for Attached Decks in Ontario
Picture a homeowner planning a small platform outside the back door. The deck may have no roof, yet its connection to the house can place it within Ontario's building-permit process. Start by asking, Does the deck attach to the principal dwelling? If yes, plan for a building permit. Hamilton's residential porch and deck guidance follows this attachment-based approach.
Then check the deck's elevation and proposed location. In Guelph, a permit generally applies when any part of the walking surface is 600 mm, or 24 inches, or higher above finished grade, according to the City of Guelph deck permit information. The guidance also identifies structural changes to an existing deck or porch at that height, including replacement of guards, as permit-related work.
What permit drawings should show
A permit application needs more than a sketch of the finished boards. The drawings should let the reviewer follow the deck from the house connection to the ground:
Ledger connection: Show where the ledger sits, how it anchors to house framing, and how flashing keeps water out.
Footing locations: Mark every footing, post, and beam.
Load path: Show how loads travel through decking, joists, beams, and posts into the ground, with the house connection identified where it carries load.
Stairs and guards: Include the stair arrangement, guard locations, and relevant dimensions.
Site relationship: Place the deck against the house, lot lines, and other site constraints.
These details connect three approval questions. The ledger shows how the deck joins the home, guard requirements depend partly on elevation, and zoning setbacks determine whether the deck and stairs fit the lot. A design can satisfy the permit threshold yet still need revisions for structural or zoning reasons.
A roof or addition may require further approvals, so a basic deck permit does not automatically cover a larger outdoor renovation.
Ledger Attachment and Flashing Requirements You Must Know
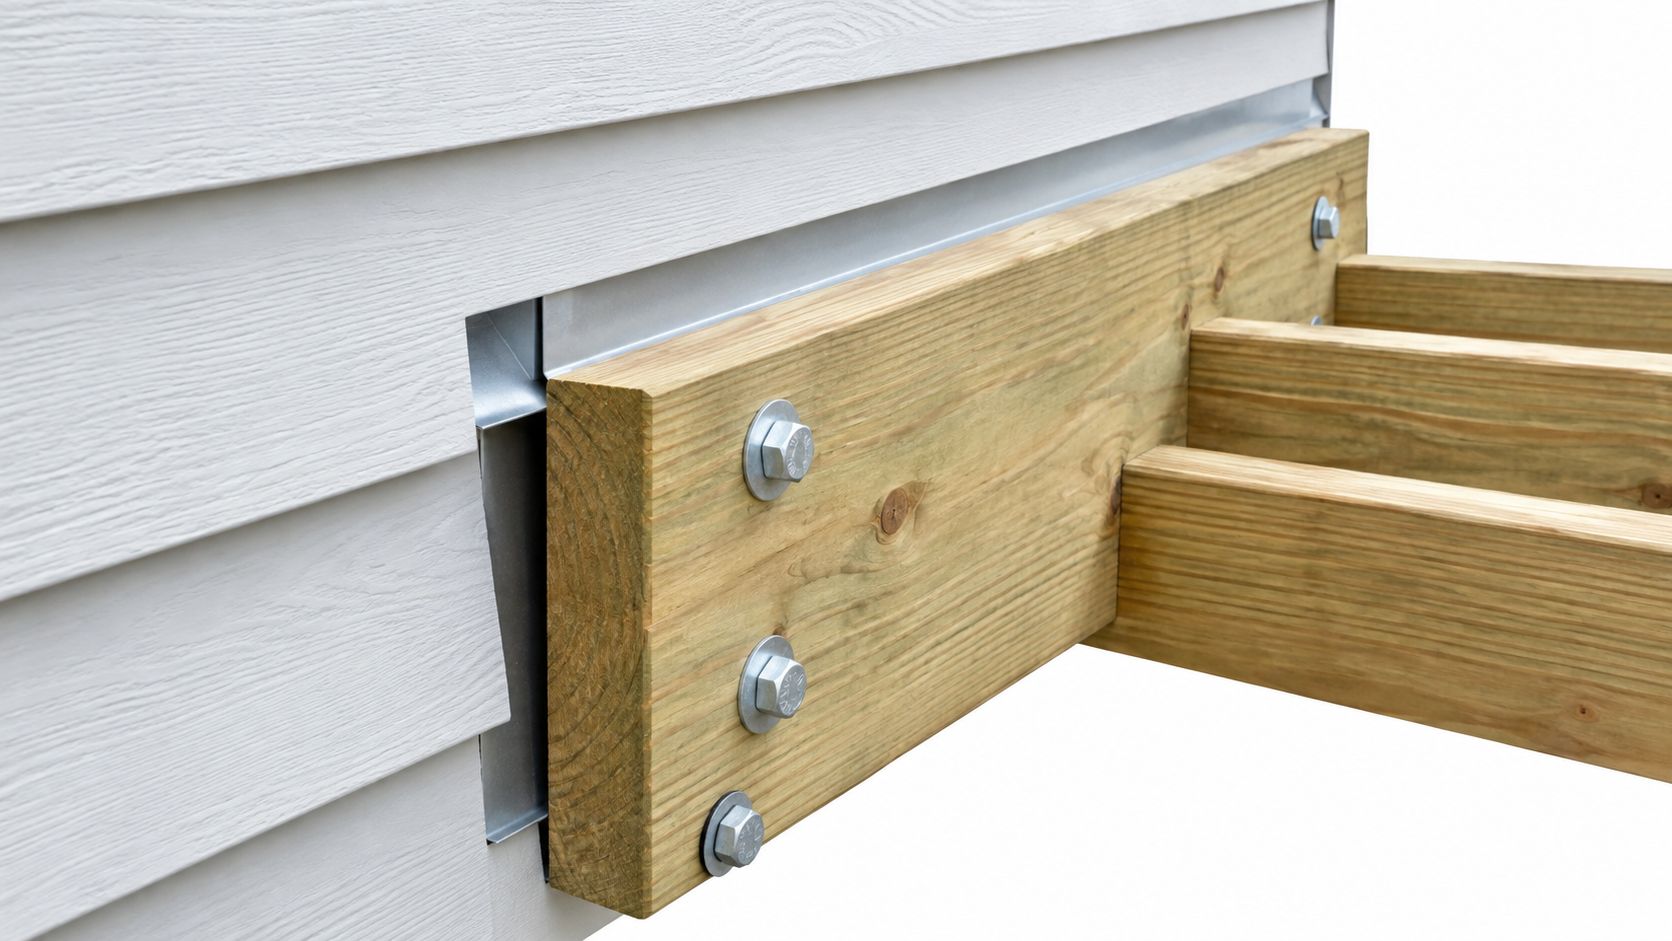
The ledger is the board that connects the deck to the house, but it shouldn't be treated as a simple trim piece. It forms part of the load path, transferring forces between the deck framing and the house structure. A permit reviewer will want to see positive anchoring into suitable house framing, not merely fasteners placed through siding.
Read the wall as a system
Before installation, identify the siding, wall sheathing, rim or band joist, insulation, and interior framing. The ledger must connect to structural framing in a way that matches the approved drawings. Fasteners and hardware need to be appropriate for the material and connection, and joist hangers must be installed as specified by the selected system.
The ledger also has to resist movement caused by the deck's weight and everyday use. That's why drawings should show the connection rather than label a board “ledger.” A contractor who can't explain where the fasteners land, how the loads transfer, and how the connection stays dry hasn't provided enough detail for a confident review.
Water-management check: Flashing should direct water away from the wall and framing. A strong connection that lets water enter can still create a serious long-term problem.
Flashing belongs behind and over the ledger assembly as appropriate to the wall construction. It should integrate with the existing cladding and drainage plane rather than stopping at the top edge of the board. Homeowners who want a visual installation reference can consult this step-by-step deck flashing how-to, then ask the contractor how the proposed detail suits the specific house wall.
For a Guelph-specific discussion of the connection, see the deck ledger board flashing guidance. Don't cover the ledger before the required framing review if the municipality needs to see the connection during inspection.
Footings Beams and Structural Load Paths Explained
An attached deck still needs independent support beneath it. The ledger connects one side to the house, but posts, beams, and footings carry the deck's other forces into the ground. Thinking in terms of a continuous load path helps explain why a deck can't rely on the house wall alone.
The surface load begins at the decking and moves into the joists. Joists transfer that load to the ledger and beams, beams deliver it to posts, and posts deliver it to footings. Each connection must match the layout shown on the permit drawings. If a beam moves during construction, the footing positions may no longer support the intended spans.
Why layout decisions affect the ground
A longer span can change beam size, post spacing, and footing placement. A deck with stairs, a roof, built-in seating, or multiple levels may introduce additional forces that require more careful design. Don't choose footing locations based only on where you'd like the posts to appear. The locations must work with the framing plan and the soil conditions on the property.
Footings also need protection from movement caused by local ground conditions and seasonal changes. The appropriate design depends on the site, the structure, and municipal requirements. Where soil is uncertain, sloped, disturbed, or poorly drained, a contractor may need to flag the condition for additional review rather than guessing at a standard solution.
Connections deserve the same attention as lumber
Posts need suitable bases, beams need properly designed connections, and joists need compatible hangers or bearing details. Hardware should suit the selected lumber and outdoor exposure. Premium fasteners alone won't correct an undersized beam or a post that doesn't sit over its footing.
A useful plan review asks three questions:
Where does each load begin? Check the surface, joists, stairs, and any attached features.
Where does each load go? Follow the path through beams, posts, footings, and the house connection.
What could interrupt that path? Look for missing blocking, unsupported beam ends, shifted posts, or connection details that differ from the drawings.
The result should be a structure that works as a coordinated assembly, not a collection of individually strong-looking parts.
Guard Height Strength and Safety Rules for Raised Decks
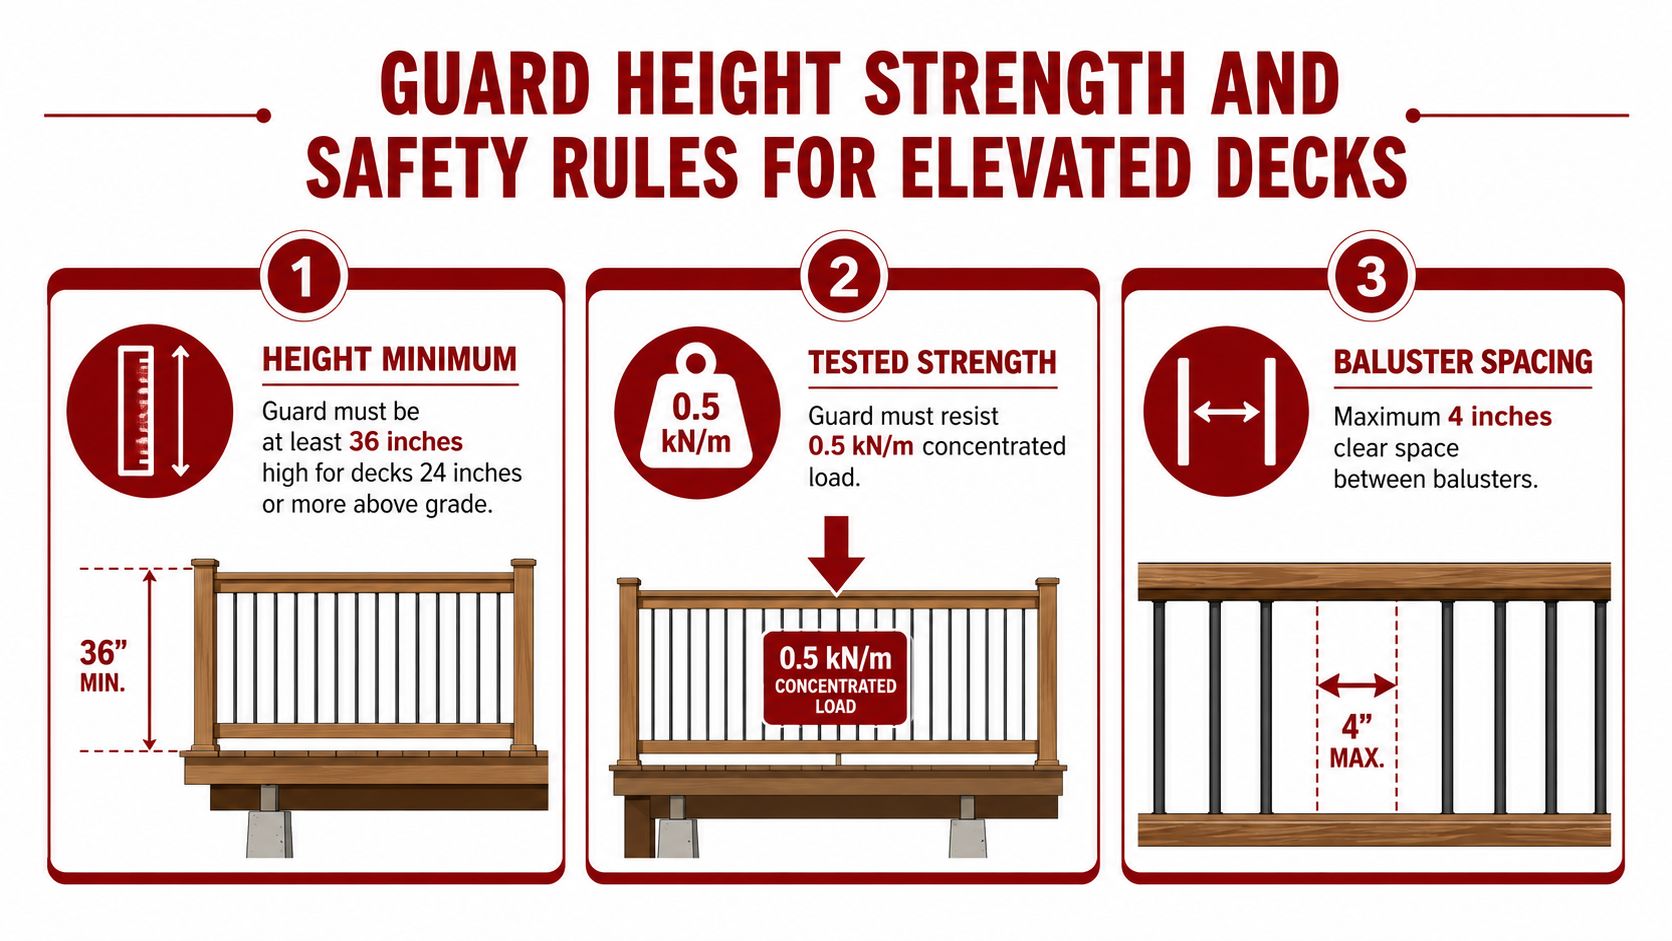
A deck can pass its framing review and still create a safety problem if its guard is too short, too weak, or poorly spaced. Ontario guidance requires guards where a walking surface is more than 600 mm, or 24 inches, above ground. Openings must also prevent a 100 mm sphere from passing through, as explained in Ontario deck guard guidance.
Guard height follows the fall distance. For residential exterior decks, Ontario measurements are 900 mm where the walking surface is at or below 1.8 metres above grade, and 1,070 mm where the drop exceeds 1.8 metres, according to Ontario guard height and load guidance. Guelph's handout presents the same decision in imperial units. It lists a minimum guard height of 35 inches when the deck surface is from 2 feet to 5 feet 11 inches above grade, and 42 inches when it is more than 5 feet 11 inches above grade.
Height is only one part of the check
A guard must withstand the forces expected during ordinary use. For an exterior balcony or deck serving a single dwelling unit, Ontario criteria include a horizontal load of 0.5 kN/m or a concentrated 1.0 kN load, whichever governs. Other exterior residential guards can require 0.75 kN/m or a concentrated 1.0 kN load, together with a 1.5 kN/m vertical top-rail load, according to the Ontario guard load requirements.
Posts, rails, infill, fasteners, and connections therefore need to function as one assembly. Check openings near the deck surface as well as spaces between decorative components. A strong-looking top rail does not correct weak post connections.
Measure from the finished walking surface to finished grade at the relevant location, rather than from the joists or an existing patio. On a sloping lot, the same attached deck may have different guard requirements around its perimeter. That measurement also helps connect the building-code review with the deck's zoning and permit review.
For a local explanation of railing details, see this Ontario deck railing code guidance. Keep zoning separate in the approval check, because setbacks and other local rules can affect the deck layout even when the guard meets Ontario structural requirements. A guard that fits the lot, the fall height, and the attachment plan is easier to review as part of the complete permit package.
Stair Geometry Landings and Handrail Compliance
Stairs turn an attached deck into a daily route through the home. Someone may carry dishes down them, a child may hurry up, and an older adult may need steady, predictable footing. Consistent geometry helps each step feel the same instead of creating a hidden trip point.
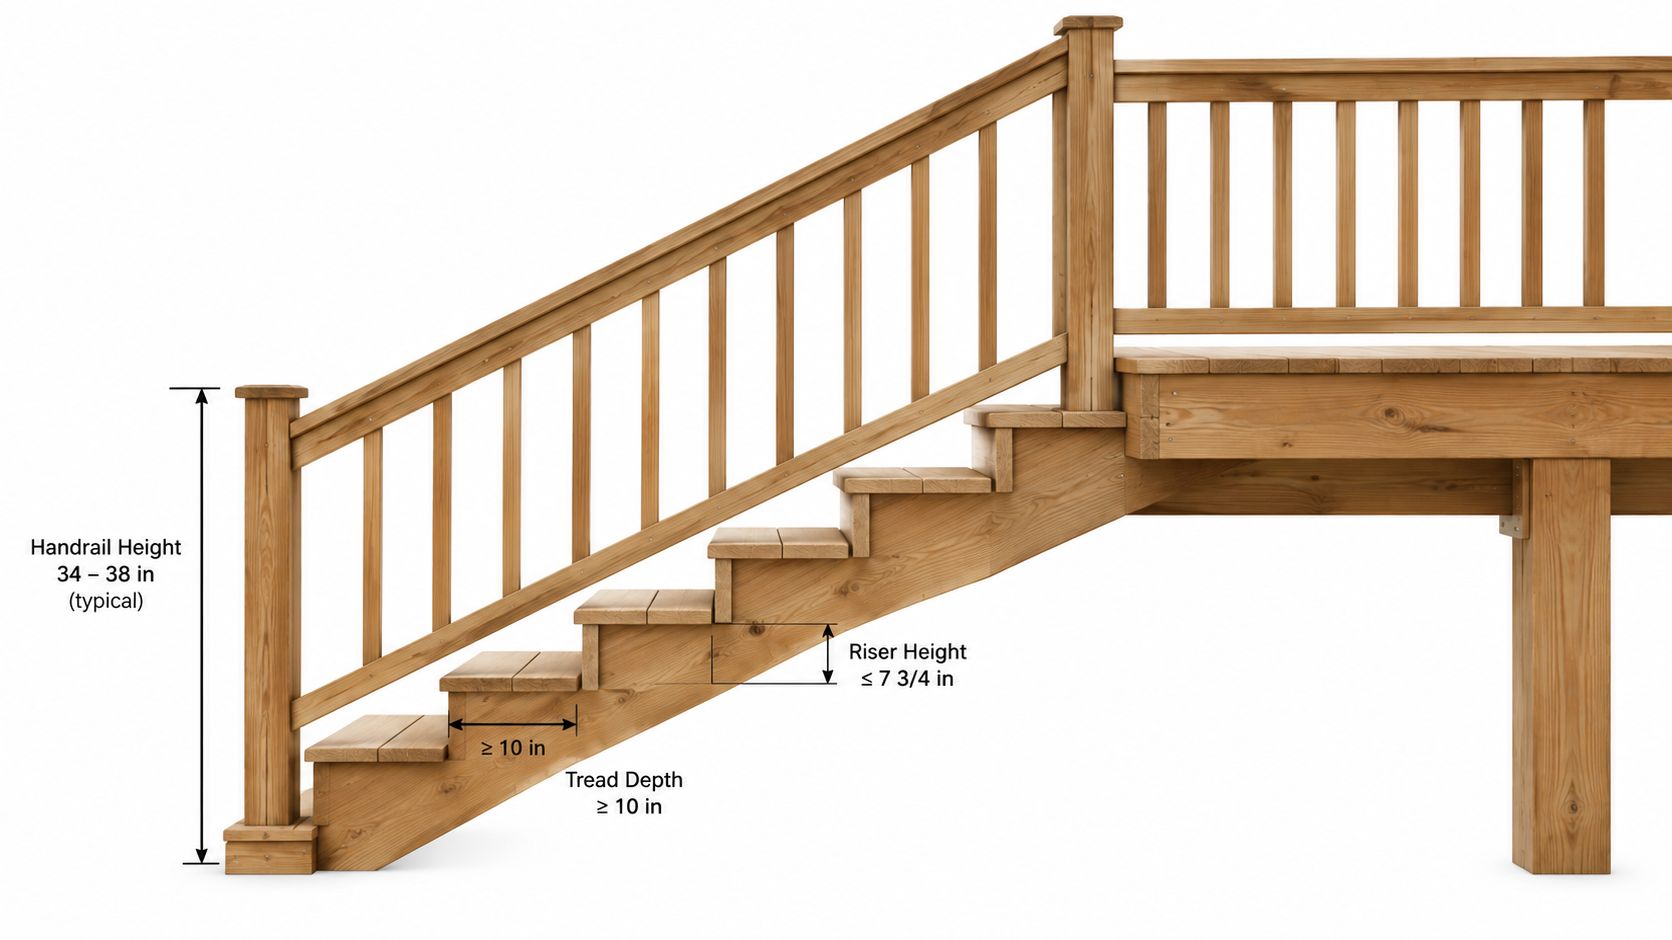
Guelph's handout sets a maximum riser height of 7-7/8 inches and a tread depth between 10 and 14 inches, as shown in the Guelph deck permit handout. Measure every riser and tread, not only the first and last. Even a small difference changes where the foot lands.
Check the stair run before the build
Begin with the total vertical rise from the finished deck surface to the landing or grade. Divide that height into equal risers, then verify that the result stays within the permitted maximum. Choose a tread depth within the stated range and calculate the stair's horizontal projection.
That calculation also connects stair design with the lot plan. A comfortable stair run can extend farther into the yard than expected, particularly on a narrow lot. If the stairs approach a side or rear property line, show the complete stair and landing footprint during the zoning review.
Guards and handrails use different measurements
Stair and landing guards are measured vertically from the guard's top to a line through the tread nosings or the landing surface. General stair-flight guards are at least 900 mm high. Exterior stairs and landings more than 10 metres above adjacent ground level require guards at least 1,500 mm high, according to Ontario stair and landing guard guidance.
A handrail is a separate part of the stair system. Plan its location, continuity, and graspability with the stair layout rather than adding it after the stringers are framed. Put the stair dimensions on the drawings, then compare them with the built work before stringers and railings are enclosed or finished. This gives the permit review, the lot layout, and everyday use one consistent set of measurements.
Zoning Setbacks Lot Coverage and Municipal Expectations
A building permit doesn't automatically make the proposed location acceptable. Zoning is a separate approval layer, and it can restrict where an attached deck sits, how much of the lot it covers, and whether a roof or projection may extend toward a property line.
This matters on smaller urban lots. A structurally sound deck may still need a redesign if it encroaches into a required yard, exceeds a coverage limit, or includes a covered projection that has different setback conditions. The 2026 Ontario homeowner guide describes local variation in guardrail heights, lot-line setbacks, and coverage limits. It gives examples including a 0.9 m minimum guardrail height, a 1.2 m maximum under zoning, 1 m from the interior side lot line for covered projections, and at least 2 m from the rear lot line.
Those figures belong to the cited guide and shouldn't be treated as a universal substitute for Guelph's zoning rules. Confirm the applicable designation, lot conditions, and projection rules with the municipality before finalising the drawing.
Put the site plan ahead of the wish list
A practical site review should identify:
Property boundaries: Confirm the lot lines used for the design, especially where the deck or stairs will sit close to a neighbour.
Deck footprint: Include stairs, landings, posts, and covered elements rather than measuring only the main platform.
Coverage conditions: Ask how the proposed structure affects permitted lot coverage.
Guard and roof limitations: Check whether zoning controls the visible height or covered projection separately from building-code requirements.
Municipalities are also moving toward online-only permitting workflows, including Toronto's Express portal and Windsor's Cloudpermit process. That makes clean, accurate pre-drawing checks more valuable, because an incorrect site plan can lead to resubmissions even when the structural drawings are sound.
Quick Reference Lookup for Attached Deck Code Decisions
Use this matrix at the first design meeting. It does not replace confirmation from Guelph or the applicable authority, but it puts permit, structural, safety, and zoning questions on the same page. An attached deck is approved as one connected system: the ledger transfers the deck load to the house, guards respond to the walking-surface height, and setbacks determine whether the proposed footprint fits the lot.
Attached Deck Code Quick Decision Matrix
Deck Condition | Code Trigger | What to Verify | See Section |
|---|---|---|---|
Attached to the principal dwelling | Permit required for an attached deck of any size | Ledger connection, footing layout, load path, and application drawings | When Permits Are Required for Attached Decks in Ontario |
Walking surface at or above 600 mm, or 24 inches, above finished grade | Guelph permit review generally applies | Finished elevation, guards, stairs, and structural changes | When Permits Are Required for Attached Decks in Ontario |
Ledger fixed to the house | Structural review of the attachment | Positive anchoring, suitable framing, flashing, and compatible hardware | Ledger Attachment and Flashing Requirements You Must Know |
Deck supported by posts and beams | Independent ground support required | Footing positions, beam spans, post bases, and continuous load path | Footings Beams and Structural Load Paths Explained |
Raised walking surface requiring guards | Guard height, strength, and opening rules apply | Height at the relevant drop, load resistance, and openings that block a 100 mm sphere | Guard Height Strength and Safety Rules for Raised Decks |
Stairs serving the deck | Stair geometry and guard checks apply | Maximum riser, tread depth, consistent measurements, handrails, and landings | Stair Geometry Landings and Handrail Compliance |
Deck near a lot line or with a roof | Zoning review may limit location or projection | Side and rear setbacks, lot coverage, covered projections, and zoning guard limits | Zoning Setbacks Lot Coverage and Municipal Expectations |
A permit-ready conversation checklist
Before plans are submitted, ask the designer or contractor to show the finished deck height at each side, rather than one general elevation. Review that information with the ledger detail, footing and beam layout, stair geometry, guard heights, and site setbacks. These decisions interact: a change in height can affect guards and stairs, while a wider footprint can affect coverage or setbacks.
Keep the approved drawings available during construction. If a post, stair, guard, or ledger detail changes, ask whether revised information is needed before work continues. The completed deck should match the approved design closely enough for the inspector to check the intended structural and safety decisions.
Homeowners should confirm that the contractor carries insurance and can provide clear drawings, material details, and inspection coordination. Guelph Deck Builders offers consultation, site assessment, permit-ready drawings, and installation by insured contractors for cedar, composite, vinyl, and pressure-treated wood decks. This gives homeowners a way to organise ledger, guard, stair, footing, and zoning questions before construction begins.
Guelph Deck Builders can assess your property, develop permit-ready drawings, and coordinate an attached-deck build around these requirements. Visit Guelph Deck Builders to start a site consultation and turn your deck idea into a code-conscious plan.
Comments